Just another box?
#8
Depends...made out of Pine leftovers...
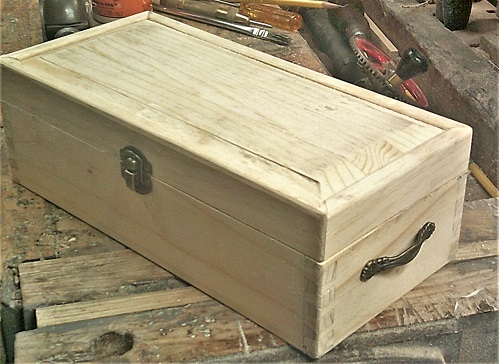
   
Resawn down to 1/2" thick....with a raised panel for the lid..
Corners:   Box is through dovetails, lid is simple miter joints..
   
Purpose?
   
To securely hold and store a Dado plane


Spent the last couple of weeks building this small plain box.....anyone interested in see a build-along?
Show me a picture, I'll build a project from that
Reply
#9
I always enjoy your posts and the build alongs...I will say though if you'd like a more hearty response I'd suggest reddit.  Much higher participation rate.
"Life is too short for bad tools.".-- Pedder 7/22/11
Reply
#10
I'm in. I'd love to see your latest build along.
Reply
#11
I really enjoy your posts
Reply
#12
Well..I had a couple leftovers to use up..
   
With a few knots that had to go away..
   
Mitersaw to remove them..
   
And this is what was left..
   
Also found that Pine panel, that used to be a chopping board for dovetail work...sorted through, trying to use that panel as a starting point
   
Had just enough for 4 sides of a box..
   
3 pieces for the lid's raised panel..and enough to build a collar to hold the raised panel in....

Problem?  too thick...so...
   
Set up the tablesaw...to both rip things for width...then resaw to 1/2" thick...was left with a pile of "Thins"..
   
chipped corner was from where the cut-off laid over onto the spinning saw blade..bounced off the wall behind me and landed on the floor.  There rest of the parts?
   
And..
   
Parts for the raised panel for the lid....have to build the box first...before I can assemble a lid to match...
Stay tuned...
Show me a picture, I'll build a project from that
Reply
#13
Decided to at least glue that Raised Panel blank into an actual panel..
   
And let this sit a day....while I got ready to dovetail 4 corners...(was also having camera issues)
   
I do pins first...BTW
   
Disston No. 68 saw..
   
A chisel or two to chop out the waste....use the pins to lay out the tails, just trace around each pin with a sharp pencil...Bandsaw to remove the waste between the tails, leaving the layout lines....then a dry fit...
   
And..repeat for the other 3 corners....full dry fit with clamps, but no glue..yet..
   
More of a way to pre-set the clamps...had a few other tasks to do, before the glue was used...
   
Panel was trimmed for square...sides of the box were grooved along the bottom edge...Panel for the bottom of the box  has a rebate all the way around, that fits into that groove, so that tha panel sits flush with the bottom of the box's sides....in theory..

Meant that after the grooves were milled...on the tablesaw ( too small to used the Stanley 45)  I had to not only rebate the edges of the panel, but..size the panel to fit IN the grooves, and the dovetails would also close up tight...LOT of test fits...
once the panel did fit....time for the glue, glue brush and those clamps..
   
I did need a spacer, to keep the sides from bowing in from the clamps..
   
And..let this mess sit a day....

Stay tuned..
Show me a picture, I'll build a project from that
Reply
#14
Ok, once the box has come out of the clamps...
   
It will get check to see IF it is still square...then a plane or two to adjust..
   
And, level the top and bottom edges...
   
And tops...
   
Planes involved?   Stanley No. 60-1/2, and Stanley No. 4-1/2c

THEN I can size the lid's panel to fit....along with that collar...

tablesaw, again....mill a blade and a half width groove along the inside, bottom edge of the 4 collar pieces....was too small to run the Stanley 45...

Groove is set to fit the Raised Panel.   Raised the panel on the tablesaw:   Tilt to 15 degrees, run all four edges through...return to 90 degrees...mill a blade width rebate on the insides of the panel....trying to fit the panel into the grooves....

Collar parts, need a trip to the mitre box..set at 45 degrees....
   
then the cut is refined a bit..
   
Between this and a plane or two....was finally able to assemble the 5 parts of a lid...and glue it up..
   
Checking for square, again...
   
Hopefully, when the lid comes out of the clamps...
   
It will look like this.   BEFORE the glue-up, I used the block plane to round-over just above where the panel goes.....but was after the miters were sawn.   That way, when the parts  are glued up, the corners will be matched up with the round-overs.....outside round-overs were done after the lid came out of the clamps..

Stay tuned...still have to clean and match the lid to the box...and see about adding the hardware...
Show me a picture, I'll build a project from that
Reply


Forum Jump:


Users browsing this thread: 1 Guest(s)

Product Recommendations

Here are some supplies and tools we find essential in our everyday work around the shop. We may receive a commission from sales referred by our links; however, we have carefully selected these products for their usefulness and quality.