03-17-2020, 12:32 AM
I had to leave a few items behind, when we moved to the current address...big 10" tablesaw, BIG routertable....Nickleson bench...to set up shop in a messy basement....
 ..quite a change from a Pole Barn..
.


2 saw horses, with a legless 4 x 4 tabletop screwed to them...old dresser that was already down there....and no bench. First off, was informed I needed a sawbench...ok


Apparently "Saw Tub" was quite it. Went Dumpster diving, found an old wooden Waterbed frame 2 x 10s, an old door stile, and a few 2 x 4s, besides the new 2x4s I bought for the saw bench project....Needed something better to work off of...drug out the 6' step ladder...


A couple Visegrip finger clamps among others...to clamp a plank at about the right height..


Could make all the cuts needed for the saw bench build...


Including assembly work....cutting the legs to size and angles....


Not too bad? About knee high. Notch at one end to allow a handsaw to do rip cuts....
All well and good...a nice sunny day, spent out on the back patio...letting sawdust blow out into the backyard...


Use a few tools set out on a bench......so...next bright, sunny, warm, dry Sunday morning...in a September....Set things up, again...


Made use of the saw bench at first....cutting a few things to rough length...this came from a rip cut. One of the sides of the old waterbed was cut down for leg stock..4" wide leg stock...which left this 2x for other items...
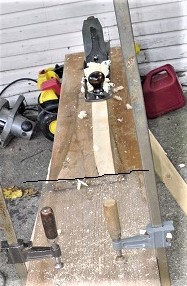
Legs were then planed...wavy, saw marks just had to go...


Plane in use? Union No. 5 A, seemed to work ok....about the same size as a Stanley No. 5-1/2
Had one of the ends from the waterbed frame...trimmed to about 5' long. Had an issue at one end, where the old corner bracket USED to be..


Laid out notches to match the size of the legs. Circular saw to rough cut, without over-cutting too much, then that had saw to finish to the cuts. This will be the bench's top...time it started to act like it...

Stay tuned..part 2 is coming right up...as soon as the new box of 3" #8 screws arrive...Lunch?
 ..quite a change from a Pole Barn..
.

2 saw horses, with a legless 4 x 4 tabletop screwed to them...old dresser that was already down there....and no bench. First off, was informed I needed a sawbench...ok

Apparently "Saw Tub" was quite it. Went Dumpster diving, found an old wooden Waterbed frame 2 x 10s, an old door stile, and a few 2 x 4s, besides the new 2x4s I bought for the saw bench project....Needed something better to work off of...drug out the 6' step ladder...


A couple Visegrip finger clamps among others...to clamp a plank at about the right height..


Could make all the cuts needed for the saw bench build...

Including assembly work....cutting the legs to size and angles....

Not too bad? About knee high. Notch at one end to allow a handsaw to do rip cuts....
All well and good...a nice sunny day, spent out on the back patio...letting sawdust blow out into the backyard...


Use a few tools set out on a bench......so...next bright, sunny, warm, dry Sunday morning...in a September....Set things up, again...


Made use of the saw bench at first....cutting a few things to rough length...this came from a rip cut. One of the sides of the old waterbed was cut down for leg stock..4" wide leg stock...which left this 2x for other items...
Legs were then planed...wavy, saw marks just had to go...

Plane in use? Union No. 5 A, seemed to work ok....about the same size as a Stanley No. 5-1/2
Had one of the ends from the waterbed frame...trimmed to about 5' long. Had an issue at one end, where the old corner bracket USED to be..

Laid out notches to match the size of the legs. Circular saw to rough cut, without over-cutting too much, then that had saw to finish to the cuts. This will be the bench's top...time it started to act like it...

Stay tuned..part 2 is coming right up...as soon as the new box of 3" #8 screws arrive...Lunch?
Show me a picture, I'll build a project from that


