Posts: 200
Threads: 0
Joined: Feb 2008
Hi all:
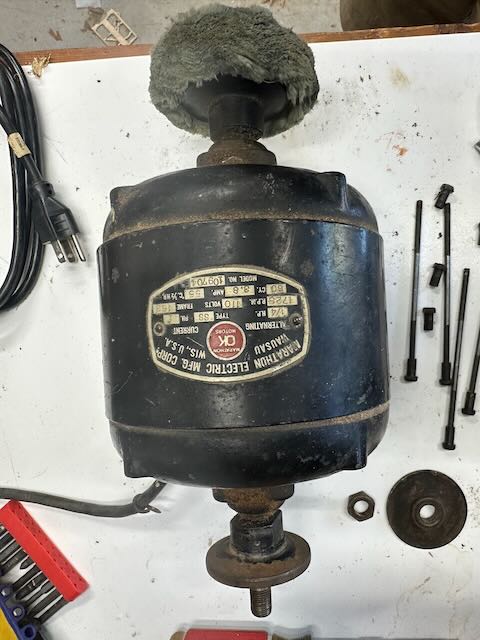
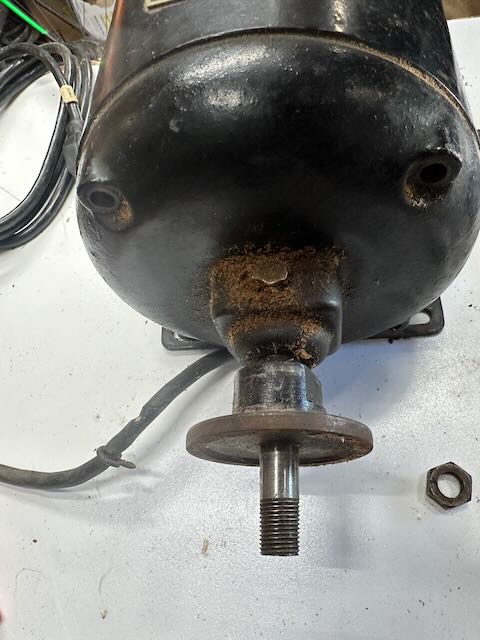
I need to replace a power cord. I've removed the 4 long bolts that pass thru the housing. I think next step is to remove the collar on the shaft with no wheel in the pic. The collars have large flats so easy to grab. The nut on the side to be removed was right handed, but the collar may be on a different thread.
Q1: Should I expect the collar to be right or left handed?
Q2: Any advice on separating the shell? It looks like a central cylinder with a hemisphere on each end, but it is tightly sealed.
Thanks
D
Posts: 1,996
Threads: 1
Joined: Aug 2016
(06-30-2024, 04:48 PM)matzner Wrote: Hi all:
I need to replace a power cord. I've removed the 4 long bolts that pass thru the housing. I think next step is to remove the collar on the shaft with no wheel in the pic. The collars have large flats so easy to grab. The nut on the side to be removed was right handed, but the collar may be on a different thread.
Q1: Should I expect the collar to be right or left handed?
Q2: Any advice on separating the shell? It looks like a central cylinder with a hemisphere on each end, but it is tightly sealed.
Thanks
D
Don't know about the collars, if they are pressed on or what. The flats are probably to tighten what ever you have on the shaft. If it is threaded they will tighten when in use so depending on motor rotation one side like you said was a right hand thread , the inner one
IF threaded would be la left hand thread. The other thing is to mark the end bells orientation in relation to the stator section. This keeps the bearings the way it has been broken in.
Normally a center punch with one mark opposite the other on one end and two marks opposite each other on the other end. Unless you can see threads I would think the collars are pressed on. Try tapping in the end bell to see if it moves out. On the end where the wires come out will probably be a centrifugal switch, so be careful sticking something iin it . Roly
Posts: 12,870
Threads: 0
Joined: Jan 2010
Location: Lewiston, NY
You might consider taking it to a motor shop. They can get it apart, clean everything and probably install sealed bearings instead of those old, open ones in there now, as well as a new power cord.
John
Posts: 22,710
Threads: 0
Joined: Feb 2005
Location: Regina Saskatchewan Canada
That motor doesn’t have bearings in it. It has brass bushings surrounded by oil wicks.
Blackhat
Bad experiences come from poor decisions. So do good stories.
Posts: 2,331
Threads: 0
Joined: Dec 2006
Location: virginia beach VA
I would try soaking the junction between the collar and the shaft with some penetrating oil first ( prop it up on its side so the oil sinks in ) I would be surprised if it was threaded, but if it is, the thread would have to be larger than the non threaded portion of the shaft, so you might look closely to see if that is the case. If not, after a good time soaking, I would try a three arm puller on it to see if it moves. Ditto what Roly said about marking the ends
Posts: 1,379
Threads: 0
Joined: Sep 2007
Standard threading for a bench grinder is that the right hand side has right hand threads and the left side has left hand threads. The trick on that motor is to determine what's the front or back.
On some buffers and grinders the flange just slides on and abuts a shoulder.
Posts: 1,996
Threads: 1
Joined: Aug 2016
(07-01-2024, 04:55 PM)blackhat Wrote: That motor doesn’t have bearings in it. It has brass bushings surrounded by oil wicks.
We call them sleeve bearings. Roly
Posts: 22,710
Threads: 0
Joined: Feb 2005
Location: Regina Saskatchewan Canada
Carefully check the shaft close to the motor. Measure shaft diameter at both ends of the flange. Look carefully for any sign of a key way groove cut in the flanges or shaft or a pin through the flange and shaft. A key or pin says it’s pressed on. Different diameters suggest a taper fit. Threaded is possible but IMO the least likely. If it appears tapered or straight pressed fit, a bearing splitter and gear puller should remove it. Put a copper penny on the end of the shaft if you use a puller. Don’t try a puller straight on the flange, it will likely warp.
Blackhat
Bad experiences come from poor decisions. So do good stories.
Posts: 200
Threads: 0
Joined: Feb 2008
Thanks to all for shared wisdom. After closer inspection it is clear the shaft is larger thru the flange and there is no evidence of threads on either side. Soaked with Kroil and now have an excuse to buy a bearing splitter. That said, I am not sure that the closure of the splitter will "split" the flange from the shaft as the gap between the flange and the motor body is too large - I am assuming that this would have been the usual first step. So I plan to use the splitter skipping to step two using the splitter as a backing plate and pulling with the supplied screw. Is this the correct thinking?
Happy 4th,
D
Posts: 200
Threads: 0
Joined: Feb 2008
In other news, the bell moved a millimeter when tapped so probably no worries there.


