#10
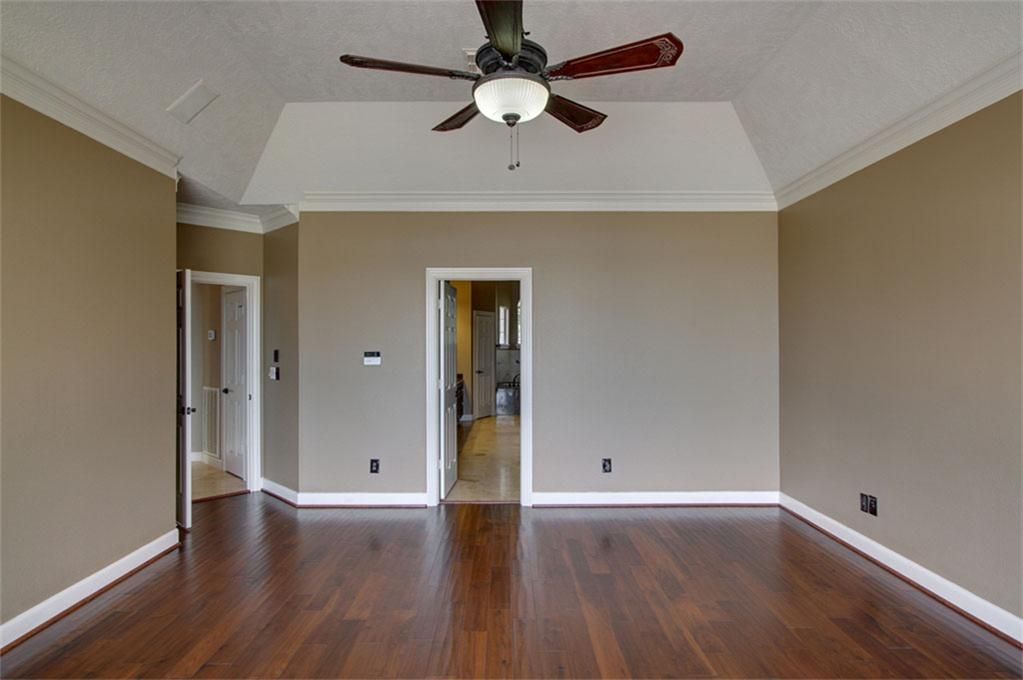
I need some help with figuring out what type of molding to apply to my sloped tray ceiling.  The side of the tray slopes upward at a 58 deg angle from the vertical.  This angled side then meets the ceiling.  The picture below shows what I mean.  This is not my picture - I found it online - but it is better than the pictures I took of my ceiling.  The sides of my tray are more sloped to the horizontal than in this picture.

I would like to install some type of molding where the sloped side meets the ceiling.  But I am concerned that just using regular crown will not look right.  Have any of you run into this situation and if so what did you find to work best?  Regular crown or some design using built up pieces?  I am open to suggestions.


Thanks!
You can observe a lot just by watching. YB
Reply

#11
Personally, I think trim there wouldn't look that good just above the other trim. False beams might look nice.
Reply
#12
(11-20-2019, 09:25 PM)Woodchukker Wrote: I need some help with figuring out what type of molding to apply to my sloped tray ceiling.  The side of the tray slopes upward at a 58 deg angle from the vertical.  This angled side then meets the ceiling.  The picture below shows what I mean.  This is not my picture - I found it online - but it is better than the pictures I took of my ceiling.  The sides of my tray are more sloped to the horizontal than in this picture.

I would like to install some type of molding where the sloped side meets the ceiling.  But I am concerned that just using regular crown will not look right.  Have any of you run into this situation and if so what did you find to work best?  Regular crown or some design using built up pieces?  I am open to suggestions.


Thanks!

Attic molding, made for this wall to ceiling molding. This is similar to a crown but no Ogee , just a large cove. Often a 1x8 is first nailed on the wall.
Then the attic molding is installed . This type of molding will fit many if not all wall/ ceiling angles. After the 1x8 is installed, cut a short piece of attic molding. Use it to see how it fits best for looks against the flat board. Then measure up from the bottom of the board to the bottom of the molding. Set combination square to this height and mark the board in several places.  You can miter and cope same as for crown . 
Once in a while I ran into a wall/ceiling joint that was low enough to see the top edge of the attic molding. This require sawing or planning the edge so it fit tight. If the edge is not planed then it will show a gap which is a dust collector. You would only see this in an actual attic with a low ceiling.

mike
Reply

#13
(11-21-2019, 03:05 AM)mike4244 Wrote: Attic molding, made for this wall to ceiling molding. This is similar to a crown but no Ogee , just a large cove. Often a 1x8 is first nailed on the wall.
Then the attic molding is installed . This type of molding will fit many if not all wall/ ceiling angles. After the 1x8 is installed, cut a short piece of attic molding. Use it to see how it fits best for looks against the flat board. Then measure up from the bottom of the board to the bottom of the molding. Set combination square to this height and mark the board in several places.  You can miter and cope same as for crown . 
Once in a while I ran into a wall/ceiling joint that was low enough to see the top edge of the attic molding. This require sawing or planning the edge so it fit tight. If the edge is not planed then it will show a gap which is a dust collector. You would only see this in an actual attic with a low ceiling.

mike

I like the idea of a large cove.  But can you give me a little more information on how the 1x8 is installed and where the cove molding is nailed to it?  I'm just having trouble visualizing it.  Also, all cove moldings I've seen are 90 deg.  If I put a 90 deg cove across the joint where the wall meets the ceiling it will curl away from the wall and ceiling.  Maybe this is where the 1x8 comes in.   

I agree with everyone that regular crown will not look right - it would be quick and easy but I think I would regret it.  Also, I need to install some type of molding because the drywall tape has split in many places all around the tray ceiling.  I would much rather spend my time and effort putting up molding to improve the ceiling than repairing that seam.  And besides, Making all that dust in the house will get me in big trouble.
You can observe a lot just by watching. YB
Reply

#14
(11-21-2019, 07:35 PM)Woodchukker Wrote: I like the idea of a large cove.  But can you give me a little more information on how the 1x8 is installed and where the cove molding is nailed to it?  I'm just having trouble visualizing it.  Also, all cove moldings I've seen are 90 deg.  If I put a 90 deg cove across the joint where the wall meets the ceiling it will curl away from the wall and ceiling.  Maybe this is where the 1x8 comes in.   

I agree with everyone that regular crown will not look right - it would be quick and easy but I think I would regret it.  Also, I need to install some type of molding because the drywall tape has split in many places all around the tray ceiling.  I would much rather spend my time and effort putting up molding to improve the ceiling than repairing that seam.  And besides, Making all that dust in the house will get me in big trouble.

Regular cove molding is at 90°. Attic molding does not have a 90° back. The profile on the back side is similar to crown, but fits a variety of roof pitches. Try to picture this, a large regular cove molding has 3 sides like a triangle. One side is the cove, the other two sides make the vertical and horizontal legs of a triangle. Attic molding has two sides, the cove and the back of the cove. Attic molding and crown look similar in this respect.
The 1x8 is nailed flat to the wall with the top of the board at the seam of the wall/ ceiling . Then the attic molding is nailed to the 1x8 and rafters. 
Because the attic molding can fit many different pitches I suggested that a small piece is held up to the board to see what looks best as far as the height of the molding looks like. Once the height is established mark the bottom of the molding and transfer a few marks around the room using a combination square set to the height needed . Do a search for " large attic molding profile" check out the third image from the top and you will see exactly what it looks like. Sorry, I do not know how to give a hyper-link , I'm too old and cranky to learn how. 

mike
Reply
#15
I tried that once, with customer supplied 6" crown. Crown just wasn't going to work and told them to come up with something else. Someone in their family apparently was a moulding maker.
They never got back to me.
Steve

Mo.


I miss the days of using my dinghy with a girlfriend too. Zack Butler-4/18/24


The Revos apparently are designed to clamp railroad ties and pull together horrifically prepared joints
WaterlooMark 02/9/2020


Reply
#16
Crown will work, but you will need to recut the bottom backside or it will not fit tight to the wall. Personally I would either leave it the way it is or redo the bottom moulding with a backer piece, probably a colonial base installed upside down flat against the wall with a dental moulding against that and then the crown back in place. You could then put crown only against the top or match the bottom setup. I have done this numerous times and it looks good. I have done up to a 9 piece layered moulding, but that was in a VERY large open foyer setup. Think 800 square feet with 12' first floor ceiling height and 9' second floor ceiling height. Really looked good the architect really nailed that one. I don't think something like that would look good in most situations try to size what you are doing compared to ceilig height. The higher the ceiling the bigger you can go.
Reply
#17
I did this in my previous home. I used a 4.5" crown molding on the bottom angle and a 3" crown on the top angle. I used an off white semi gloss enamel to blend in with the ceiling white paint.
Reply
Help with molding for an angle tray ceiling


Forum Jump:


Users browsing this thread: 2 Guest(s)

Product Recommendations

Here are some supplies and tools we find essential in our everyday work around the shop. We may receive a commission from sales referred by our links; however, we have carefully selected these products for their usefulness and quality.