Posts: 262
Threads: 0
Joined: Jan 2020
01-21-2020, 04:02 AM
(This post was last modified: 01-21-2020, 04:03 AM by GeeDub.)
The lowly picture frame is a close cousin to the lowly box. Each can be basic or more intricate. Here's a few frames, some gifts, some commissions.
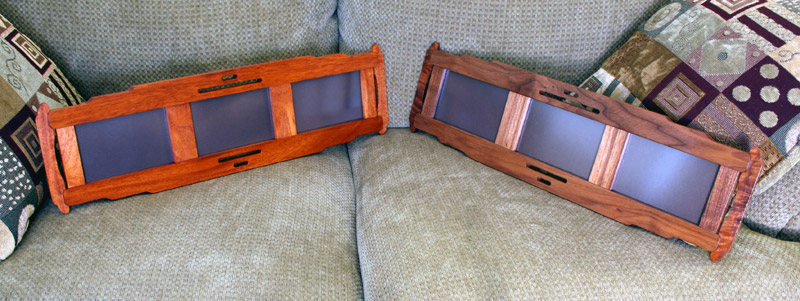
Leopardwood and 'Peruvian walnet'.
Some Greene and Greene influence; one cherry, one mahogany, one walnut.
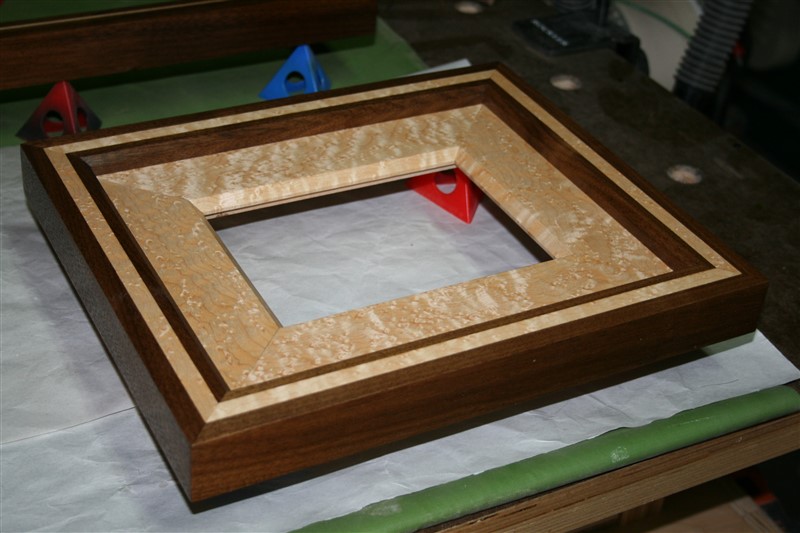
Walnut and figured maple with inlay.
Walnut and yellow heart.
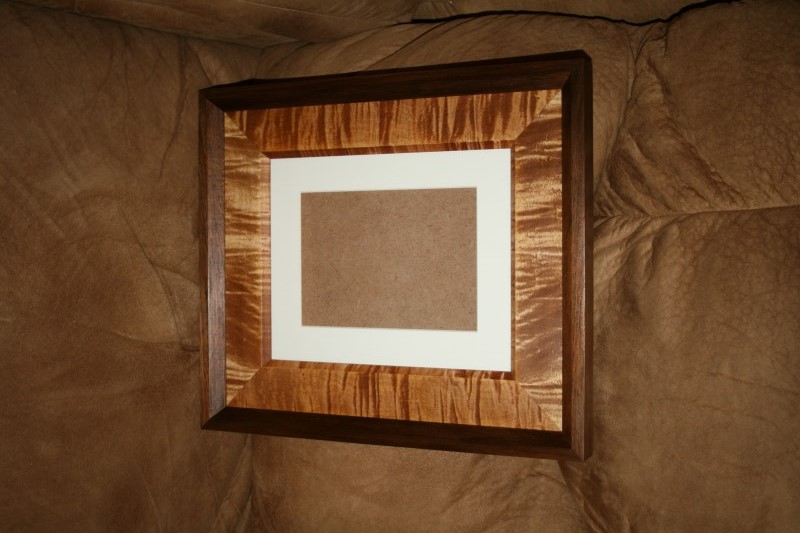
Mahogany and tiger maple inlay.
Somewhat traditional, cherry and mahogany.
Dyed tiger maple and 'Peruvian walnut'.
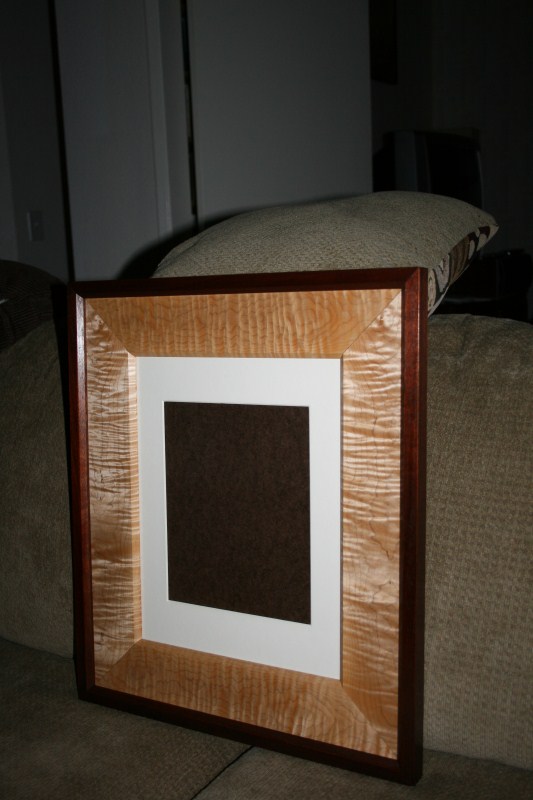
Tiger maple and walnut.
The fun thing about these is they don't take a lot of tools or a lot of time and folks really seem to enjoy them.
When I was young I sought the wisdom of the ages. Now it seems I've found the wiz-dumb of the age-ed.
Posts: 2,540
Threads: 0
Joined: Jul 2007
Location: Long Island, NY
Great frames. Peruvian walnut is my fave...
A while back I made the picture frame sled from the drunken woodworker, or at least my version. I cut parts for 9 frames in about 5 minutes... it was unbelievable. Do you use a miter sled? Or how do you deal with tuning miters?
Benny
Posts: 7,421
Threads: 1
Joined: Sep 2005
01-21-2020, 09:29 AM
(This post was last modified: 01-21-2020, 09:30 AM by Cooler.)
When I was a picture framer I had a Lion Miter Trimmer. They are now out of business because of all the cheaper (but seemingly well-made) imports.
The trimmer could be adjusted to 100% accuracy. But blades had to be sharpened professionally. I can take slices so thin that you can see the light through the slivers.
![[Image: Lion+trimmer.jpg]](http://3.bp.blogspot.com/_lKAeyE04-qM/R2C0rFpY8hI/AAAAAAAAAbk/y5pa2m7mwco/s400/Lion+trimmer.jpg)
No animals were injured or killed in the production of this post.
Posts: 2,540
Threads: 0
Joined: Jul 2007
Location: Long Island, NY
I have a knockoff miter trimmer, and yeah it's amazing. I still found myself chasing gaps around frames, so for that reason I built the sled. But oh yeah I use the trimmer for adjustments! Just far less often.
Benny
Posts: 7,421
Threads: 1
Joined: Sep 2005
(01-21-2020, 03:13 PM)bennybmn Wrote: I have a knockoff miter trimmer, and yeah it's amazing. I still found myself chasing gaps around frames, so for that reason I built the sled. But oh yeah I use the trimmer for adjustments! Just far less often.
I used (and still have) a dedicated sliding table saw for picture framing. If your sled has a solid 90 degree fence, then the trick is to cut the left miter on the left side of the fence and the right miter on the right side.
If your "fence" or guide is truly 90 degrees this will guarantee a tight miter.
If the "fence" is out of alignment by 1/2 degree then one side would measure 44½ degrees and the other side would measure 45½ degrees, but the total will always be 90 degrees, so you will always have a tight miter.
I made a mitering guide for my radial arm saw by screwing an aluminum framing square to a sheet of particle board. Since I knew that the square was accurate I only needed to slice through the aluminum with the first cut.
The sliding table saw is designed for small section pieces and will bog down on anything substantial. The RAS is much more powerful.
Also the blade for the sliding table saw cost nearly $200.00 back twenty years ago, and is vastly superior to other blades I've used, leaving glass smooth edges on both wood and aluminum moldings.
I would note that using pre-finished molding requires better setups as there is no filling going on due to after assembly finishing. It also requires cleaner cuts as there is no sanding to correct splinters, chips, etc. And the moldings are much more expensive than lumber.
No animals were injured or killed in the production of this post.
Posts: 262
Threads: 0
Joined: Jan 2020
01-21-2020, 05:37 PM
(This post was last modified: 01-22-2020, 02:09 AM by GeeDub.)
(01-21-2020, 08:16 AM)bennybmn Wrote: Great frames. Peruvian walnut is my fave...
A while back I made the picture frame sled from the drunken woodworker, or at least my version. I cut parts for 9 frames in about 5 minutes... it was unbelievable. Do you use a miter sled? Or how do you deal with tuning miters?
Thank you. I have definitely gone down the road of miter sleds, miter slot riding jigs, trimmers, disc sanders and shooting boards. All have their place and when you find the method that works for you . . . THAT's the one!!!
My "THAT's the one" at the end of this long and winding road turned out to be a well-aligned tablesaw and a very basic Incra miter gauge (V-27 IIRC). With this I get air-tight miters every time I pay attention
 . What I mean by that is that if I pay attention and perform the operation diligently, I get good results.
I have pretty well built a DRO at the tablesaw into the way I think about things. Obviously not a necessity but, this pic is from a saw or two ago. It now lives on my Saw Stop.
Here's my modified Incra. The mod is to the fence, the gauge is stock and aligned per the instructions. The blue tape is used if a "flag" has seen multiple uses. The new "first cut" through the tape gives me a precise visual location of the blade's position.
The "flag" is one of many that I use. It inserts into the stock Incra tube on a piece of milled stock that I glue sacrificial backer to.
The angled stop block and sand paper backing on the fence surface have increased my success with miters.
More on the miter gauge.
Some miters; incomplete frames.
When I was young I sought the wisdom of the ages. Now it seems I've found the wiz-dumb of the age-ed.
Posts: 314
Threads: 0
Joined: Feb 2012
Location: Carson Valley, NV
That is some VERY NICE work!
Posts: 14,931
Threads: 0
Joined: Sep 2004
Location: Butler, PA
Beautiful wood, great designs and excellent execution. Very nice work!
If you are going down a river at 2 mph and your canoe loses a wheel, how much pancake mix would you need to shingle your roof?
Posts: 2,540
Threads: 0
Joined: Jul 2007
Location: Long Island, NY
I used a framing square too! The plan/youtube video I was working from used a cut up aluminum ruler mounted to strips of 1/8" hardboard that you had to align square. I figured start square, attach them to one big piece of hardboard, and if I ever need to tweak they stay square. I also have a "flag" stop block. What makes this sled unique is you cut the rabbet for the photo itself first, and that overhangs on the ruler. So the measurement you take is from the INSIDE of the rabbet, which is the actual photo size. So for a 5X7 picture, you cut at 5 and 7". No math to compensate for the rabbet. You can see the pieces for 9 frames all cut, they all fit, no adjustments. I will second your statement about paying attention. Even with a perfect sled, if your work-piece moves, the joint won't be right.
![[Image: gRn1zSm32zeHtfRMCTL7R6y1QBGcYaJDEsZhCumn...40-h480-no]](https://lh3.googleusercontent.com/gRn1zSm32zeHtfRMCTL7R6y1QBGcYaJDEsZhCumnYuEsd45cJyNJVRrNI6VaiJW5y1SnmG9CvvCLhUK55w5AE-rznAyDrlD2s2SiT5spNisrGfyw2Ocenw3ZeFQML7ck7LUCMNOo2oE21rr9B5vub5iBX9fv62SZGT2XQ_4ece827s07WNDvvQRl6F-6NJGtJF9Q5vbnRerPY5Rtpj3ca-wJA98Taya-wQQzooh8EVZp0HCi3H_S1cyRJ34XiIphTAn8QlDf55coOstK0YkXlszVV56_gk4BcJGFRw49mLnSaTlafiR8XtzV_qzmzPgV3CoR7qSXqMQkL0uIbex_snG3QyqJ1ul4jrBUklnj0XAAAS0YoDjdo3vLkm5z8A6L4WkPAmWupkUFuO6P10oq9pQZbx5g8RhEtXqTgBlkBPPeY1t5nMh19kvy-BQkJEZJH4hVtfpmAFR8yXhSmWn55I2siI1aMnyLIj6RTRyd5zFlFKV7MQ_Lu83HGbiIcsbW4m0_eHTID7FMqZ85v0Xujx1cmWR0sQZUG3fu_OUAExcegGru9TaojTTy7EraCyX7dagn8FzWNXzdY_SjHpIw2112j3C7QM_I3W74zV_PrgaTevTvPPC6R81VJnTRlBNy_UZdpXAVamjTERtLmE2WPbKTapZWJgOC6nDRMgxJsL_N2PYxDIhQZqKP3NnXsASP5WaiiyXy951iweMnWxLmpJrfRFcLddGho-kjdp42CmMsMz3u=w640-h480-no)
Benny
Posts: 7,421
Threads: 1
Joined: Sep 2005
 01-22-2020, 09:19 AM
(This post was last modified: 01-22-2020, 09:25 AM by Cooler.)
(01-22-2020, 08:56 AM)bennybmn Wrote: I used a framing square too! The plan/youtube video I was working from used a cut up aluminum ruler mounted to strips of 1/8" hardboard that you had to align square. I figured start square, attach them to one big piece of hardboard, and if I ever need to tweak they stay square. I also have a "flag" stop block. What makes this sled unique is you cut the rabbet for the photo itself first, and that overhangs on the ruler. So the measurement you take is from the INSIDE of the rabbet, which is the actual photo size. So for a 5X7 picture, you cut at 5 and 7". No math to compensate for the rabbet. You can see the pieces for 9 frames all cut, they all fit, no adjustments. I will second your statement about paying attention. Even with a perfect sled, if your work-piece moves, the joint won't be right.
![[Image: gRn1zSm32zeHtfRMCTL7R6y1QBGcYaJDEsZhCumn...40-h480-no]](https://lh3.googleusercontent.com/gRn1zSm32zeHtfRMCTL7R6y1QBGcYaJDEsZhCumnYuEsd45cJyNJVRrNI6VaiJW5y1SnmG9CvvCLhUK55w5AE-rznAyDrlD2s2SiT5spNisrGfyw2Ocenw3ZeFQML7ck7LUCMNOo2oE21rr9B5vub5iBX9fv62SZGT2XQ_4ece827s07WNDvvQRl6F-6NJGtJF9Q5vbnRerPY5Rtpj3ca-wJA98Taya-wQQzooh8EVZp0HCi3H_S1cyRJ34XiIphTAn8QlDf55coOstK0YkXlszVV56_gk4BcJGFRw49mLnSaTlafiR8XtzV_qzmzPgV3CoR7qSXqMQkL0uIbex_snG3QyqJ1ul4jrBUklnj0XAAAS0YoDjdo3vLkm5z8A6L4WkPAmWupkUFuO6P10oq9pQZbx5g8RhEtXqTgBlkBPPeY1t5nMh19kvy-BQkJEZJH4hVtfpmAFR8yXhSmWn55I2siI1aMnyLIj6RTRyd5zFlFKV7MQ_Lu83HGbiIcsbW4m0_eHTID7FMqZ85v0Xujx1cmWR0sQZUG3fu_OUAExcegGru9TaojTTy7EraCyX7dagn8FzWNXzdY_SjHpIw2112j3C7QM_I3W74zV_PrgaTevTvPPC6R81VJnTRlBNy_UZdpXAVamjTERtLmE2WPbKTapZWJgOC6nDRMgxJsL_N2PYxDIhQZqKP3NnXsASP5WaiiyXy951iweMnWxLmpJrfRFcLddGho-kjdp42CmMsMz3u=w640-h480-no) It is even easier on a radial arm saw. I just replace the table top.
This is the dedicated sliding table saw by Frame Square (now out of business). As I recall I spent $2,300.00 back about 22 years ago. So not cheap. It comes with dust collection setup (but I had to add a vacuum). It has locking stops and clamps to hold the molding tight to the fence.
I cut on both sides of the blade.
https://www.skylinepictures.com/Frame_Mo...ge_Ken.jpg
No animals were injured or killed in the production of this post.
|


![[Image: Lion+trimmer.jpg]](http://3.bp.blogspot.com/_lKAeyE04-qM/R2C0rFpY8hI/AAAAAAAAAbk/y5pa2m7mwco/s400/Lion+trimmer.jpg)
 . What I mean by that is that if I pay attention and perform the operation diligently, I get good results.