A Project for November
#31
Back is installed....
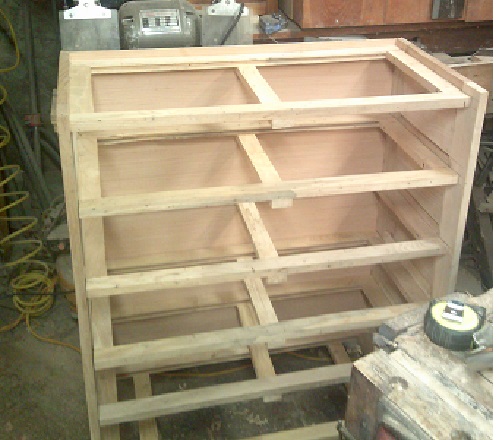
   
Upper 3 Dividers installed, glue only..
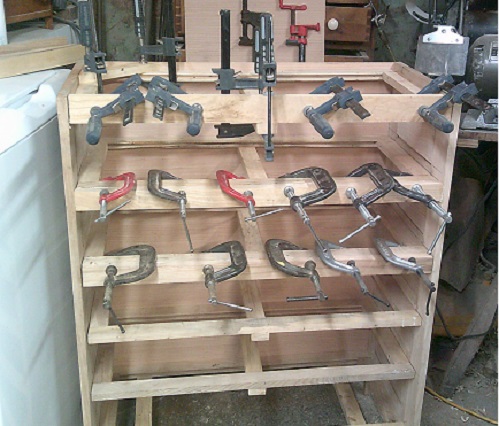
   
Corner braces..which I use to attach to the top of the case..installed..
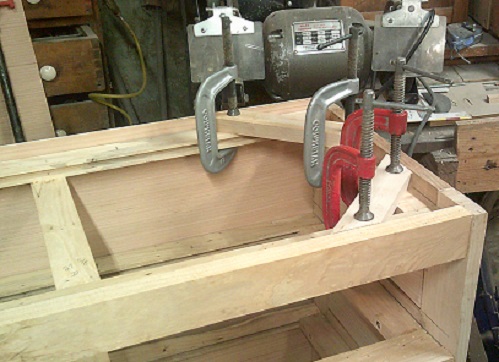
   
Once these clamps come off..
   
Screws were added..

Lower Dividers were milled and installed...glue only..
   
The fancy center point has a glue block behind it..with a screw as a clamp..

Needed 5 blanks for the drawer fronts..
   
And enough slats to glue up a panel for the Top of the case, with a bread board ends..
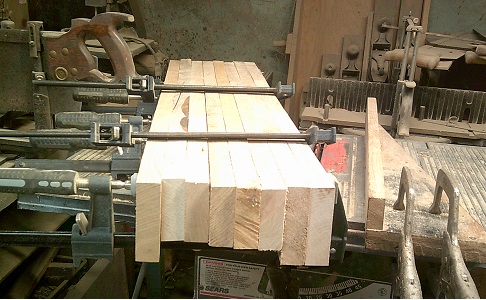
   
Both bundles are a bit thick..might get them thinned down, later....
   
THIS is all that is left...MAYBE 3 bft?


Stay tuned....

Out of 52 bft of Ash...
Show me a picture, I'll build a project from that
Reply
#32
Ok.. Road Trip, today...Boss had her errands to run..I had mine


Those 2 bundles were hauled to a friend's barn..and run through a Delta Lunch box Planer...goal being to reduce them all to 3/4" thick...got down to a 1/64" strong of 3/4", and called it good....

Planer did find a knot, and chewed it off of a board....board was then replaced by one of his "scrap" 3/4 x 6 x 6' planks...which was also sent through the planer, so that it matched the rest of the boards....had a couple Short 1 x 6 pieces, That I would send through first...so any snipe would get them and NOT the good boards...

then load things back into the Chevy..go and pick up the Boss and head for home....have the car unloaded, now...and I am in need of a NAP!

Since this is a Monday...I'll leave the shop closed for today....

Thickness was checked with a Lufkin No. 456   6" caliper rule...and yes, it does read down to 64ths...

Stay tuned..going to be a FUN week..
Show me a picture, I'll build a project from that
Reply
#33
Was able to take a few photos..
   
Hauled both "bundles" down to the shop...about the only flat place to stash them..
   
Should be a decent enough drawer front?
   
Not too sure about this one, though...

As for the "Spare" 1 x 6 I brought back home?
   
This is the "Good" part...then look up just a bit..
   
And things get ugly....at least there is just one of these..
   
Will be sending this out to the Fire Pit, later...make a cut as close to each side of this things, and still have good wood..

Repair work on the case..
   
Had a split end going on..HAD.  Cracks have been filled, awaiting sanded smooth..
   
Corner braces at the top are done..
   
Need to clear the bench off...and the top of the tablesaw...will see about gluing up a panel for the case's top...tomorrow.

Stay tuned...
Show me a picture, I'll build a project from that
Reply
#34
This is what happens, when a knot picks a fight with a LunchBox Planer..
   
The board then becomes a caul for a glue up..
   
And will later become a Bread Board end....

Top:   1st layout...
   
kind of gappy...and a few knots to deal with..
   

The gaps I can deal with...with a cordless Jointer..
   
And a steel "Yardstick" to look for any high/low spots....Yardstick is a Lufkin Tinners Rule
Then check how each of the 6 boards match up..
   
There is an 18" F style clamp at the far end of the board...hooks into the tool well. 
Got all 6 to match up, with very little "Gaposis"  , that a Pipe clamps can't handle..
   
With clamps and cauls on the ends to keep things FLAT.    Have one high spot in the middle..we have ways of dealing with that.

Sorted through the 5 blanks for the drawer fronts.....and "fired" one of them....
   
I cut off the worst part, will save the rest for a later Project...but...NO way will I be able to..
Bevel the edges to make it a raised panel
Rebate 3 edges to make a 3/4 overlay front
And..mill halfblind dovetail sockets...into something that would just crumble away...this nasty thing is heading for the Fire Pit, later..

I cut it's replacement from the "New" 1 x 6 x 6'5" plank...now, if and when I can just get my tablesaw back from being a Glue-up Table...I can start on Drawer Making 101?
Stay tuned..

Almost forgot...Filled and sanded smooth any crack and high spots in the case itself...then ran a small cove bit in a router, all along the outside edges
   
But, not along the back of the case...not enough wood for it...will be re-using that bit later..for around the top edge of the finished Top...
Show me a picture, I'll build a project from that
Reply
#35
Looking great......
As of this time I am not teaching vets to turn. Also please do not send any items to me without prior notification.  Thank You Everyone.

It is always the right time, to do the right thing.
Reply
#36
Looks like I have a LOT of catching up to do...will try this evening..as Boss says "WE" have a road trip to do...be after dark BEFORE we get back home...

Drawer fronts have been milled
Drawer sides have been milled to fit the fronts,
Drawer sides now have a groove to house the bottom panels

1st two drawers now have dados mill to house the back of the drawers

This MIGHT take a while to write up?
Teaser?
Sides cut to length..
   
Same for the drawer fronts..
   
test fitted.
   
Yes, they are to look like raised panels

Stay tuned...
Show me a picture, I'll build a project from that
Reply
#37
Drawer fronts:
   
Tilt tablesaw blade to 15 degree..run a test piece a few times..until it looks good..then do all 5 drawer fronts..
   
Next? need rebates on the ends and a groove along the bottom edge..
   
And a rebate along the top edge...as these will be 3/4 Overlay drawer fronts...rebates done on the tablesaw,,the grooves?
   
Old school way?   Stanley No. 45, type 20..1/4" cutter, 1/4" depth of cut...1/4" up from the bottom edge.

Rebate clean up..
   
#78 to smooth out any rough spots...and level things out. 

Lunch box planer had left ripples on the faces..
   
We have ways to remove ripples..Stanley No. 80...

Put the tablesaw out of the way...but keep the rip fence within reach
   
As a router table will need it.   Set up with a 1/2" dovetail bit..
   
As it is much easier to do all of these...
   
On BOTH ends of 5 drawer fronts....

Drawer #4 was "Special", though..
   
As it was a bit narrower than the other 4 drawers

Next episode?  Milling the sides for each drawer..
Stay tuned..
Show me a picture, I'll build a project from that
Reply
#38
Are you doing the dovetail joints free hand on the router table or are you using a template of some sort?
Reply
#39
Fence has a Start & Stop" line...Tells me when to stop the cut...I more or less have to set up each cut by the MK 4 Eyeball...One end was run with the grooved edge against the fence..the other end, I had to place the rebated Top edge against the fence...

Tails will get traced out, sawn and then chopped with a chisel..

Issues with the pine sides...needed to plane them flat..
   
As some were cupped quite a bit.
   
Makes joinery a little bit easier to do..
Figures..get the last corner done, before I get the hang of doing them...

Grooves?
   
Still had this Stanley No. 45, type 20 all set up...
Then..dados?
   
Stanley #45, Type 4, this time.....there was an issue...as the depth stop was set an 1/8" too deep...more on that later...
Sides were matched up to the drawer fronts they will be getting attached to....then stashed in the case..
   
Have errands to run..be back later with more details...
Stay tuned..


Attached Files Image(s)
   
Show me a picture, I'll build a project from that
Reply
#40
Had 3 tasks to do, today..
Task #1...assemble with glue & screws all 5 drawers. and sand them smooth..then install the knobs...
   
Done. 

Task #2....drill a slot into each of the four corner braces..
   
Done.   Slot allow the top to expand and contract as the seasons change...The top is attached to these corner braces with screws, and washers...and NOT come up through the top...will involve sitting the top on either the bench or the tablesaw...lifting the empty case onto the top, getting it centered up, and have the right drill on hand to install the screws...

Speaking of the Top...Task #3 was to clear off the tablesaw...haul this thing over to the tablesaw..
   
And get set up to level/flatten both faces....square the ends....mill a tongue on each end...set it aside while I mill the Bread Board ends to match...them assemble with a bit of glue....front corners will get a radius cut....hate walking past and hitting my arm on a sharp corner.....then a small cove bit is run around the top's edges...

Needles to say..Task #3 did NOT get very far...today...already had just enough fun for one day..

Stay tuned..
Show me a picture, I'll build a project from that
Reply


Forum Jump:


Users browsing this thread: 2 Guest(s)

Product Recommendations

Here are some supplies and tools we find essential in our everyday work around the shop. We may receive a commission from sales referred by our links; however, we have carefully selected these products for their usefulness and quality.