Posts: 420
Threads: 0
Joined: Nov 2007
Location: Concord, CA
 07-01-2024, 03:33 PM
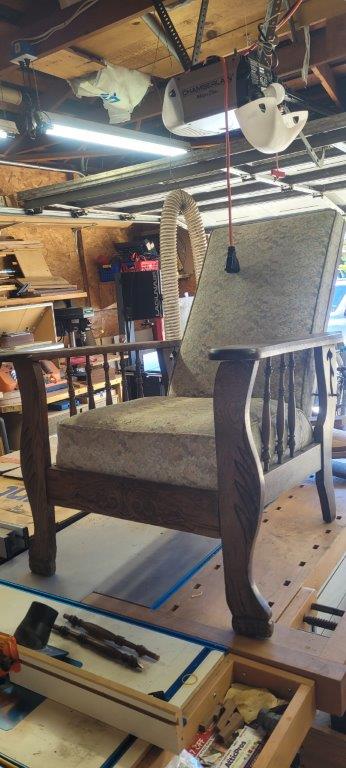
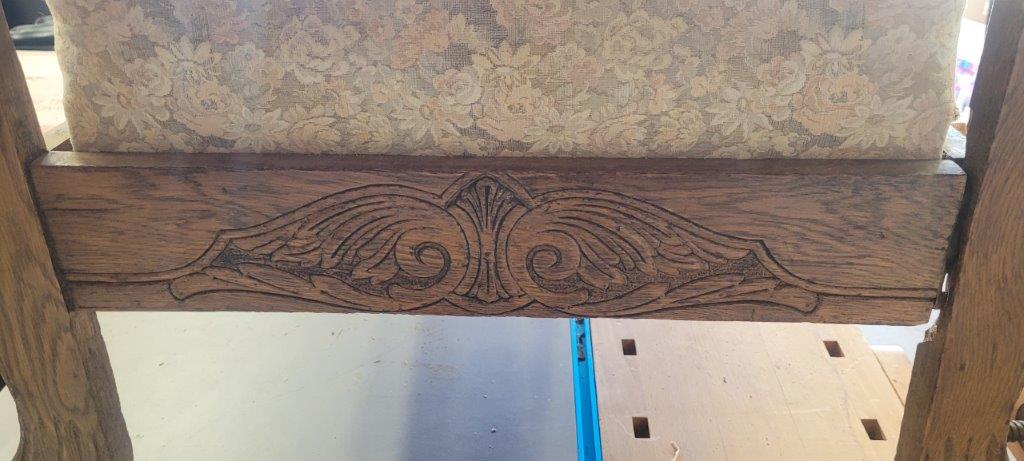
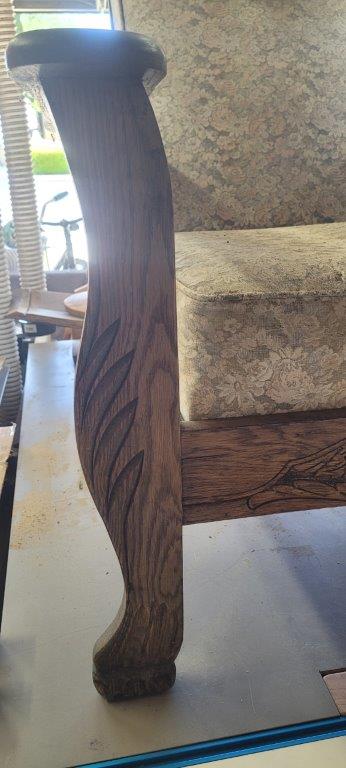
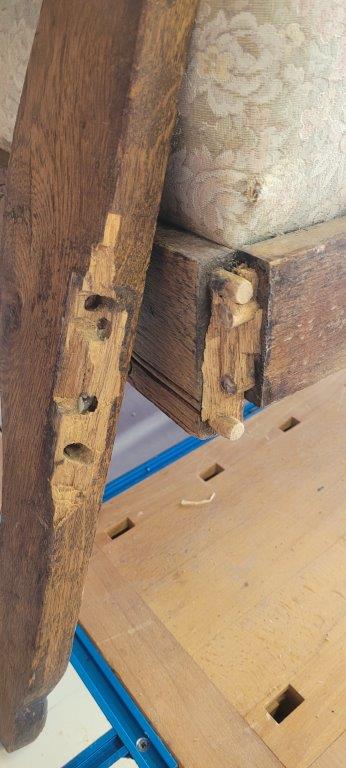
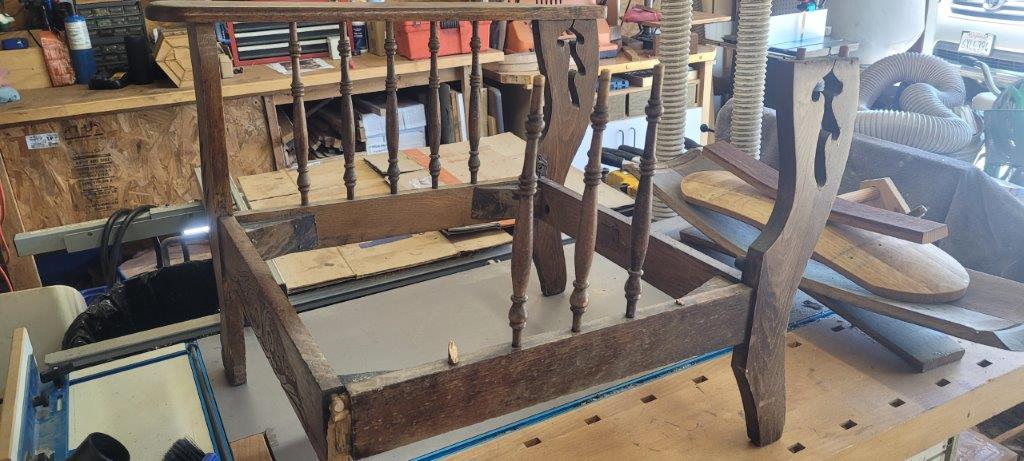
I was able to pick up this "vintage" morris chair from a neighbor who claimed the repair was out of their skill level. I have some thoughts about how best to make the repair, but I also wanted to see if I could determine it's style, vintage, and possible future worth to help determine the level of effort and how I repair the leg.
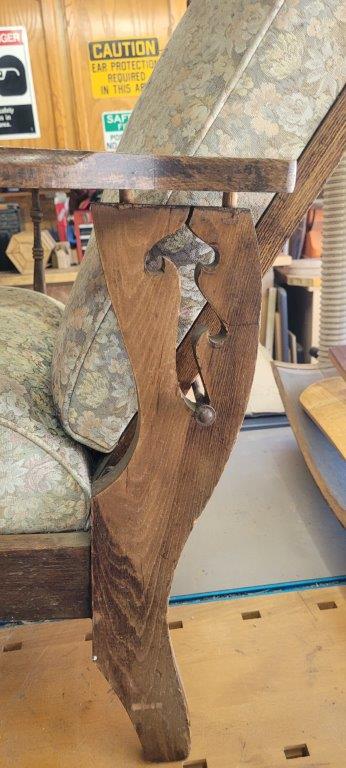
I've searched the internet ad nauseum to try to find a similar style but haven't found anything. A couple distinctive details on this particular chair I haven't seen online are 1) the seat and backrest are single removable pieces, i.e., the structure/frame and cushions are integral, not separate like most chairs; and 2) the elevation control is actually cut into the back legs vs having a metal hardware for the support rod to rest within.
A couple questions for the group:
1) Does anyone know this particular style and/or age? I'm guessing it's either a department store version that was mass produced, or a one off homemade version. particularly with the dowel construction of the leg joints.
2) Based on a possibly unknown age, and the difficulty of replacing the front leg without taking the whole chair apart, I'm considering simply drilling through the dowel holes on the front leg, cutting off those dowels from the side piece and driving new dowels in once the leg is attached to the front board. Possibly plugging with a different wood as a design element, or trying to blend it in to be unseen. If I make it a design, I'd also mimic it on the other leg for symmetry. Thoughts?
3) Other advice on fixing the leg joint? I've already cleaned out the broken wood from the dowels.
Thanks
Kevin
Posts: 14,856
Threads: 10
Joined: Jan 2010
Location: southeastern VA
A Morris chair was added to my bedroom when I was a kid.
My guess is that we got it as a hand-me-down ~'60 when my grandmother and one of her sisters consolidated households. I do not remember my grandmother having it on the farm. So, it likely was part of her sister's household in Baltimore. If true, it was likely 20yo when we got it.
As you said, the cushions were separate from the seat and back.
The adjustable mechanism for the seat back tilt was a metal bar supported by scallops in a vertical hole in the rear legs. That was similar to what your chair has, but there were more adjustment levels than your chair. I never knew that there was a different support mechanism for the back.
Sorry, but I can't help you with information for the restoration.
"the most important safety feature on any tool is the one between your ears." - Ken Vick
A wish for you all: May you keep buying green bananas.
Posts: 420
Threads: 0
Joined: Nov 2007
Location: Concord, CA
(07-01-2024, 07:06 PM)iclark Wrote: A Morris chair was added to my bedroom when I was a kid.
My guess is that we got it as a hand-me-down ~'60 when my grandmother and one of her sisters consolidated households. I do not remember my grandmother having it on the farm. So, it likely was part of her sister's household in Baltimore. If true, it was likely 20yo when we got it.
As you said, the cushions were separate from the seat and back.
The adjustable mechanism for the seat back tilt was a metal bar supported by scallops in a vertical hole in the rear legs. That was similar to what your chair has, but there were more adjustment levels than your chair. I never knew that there was a different support mechanism for the back.
Sorry, but I can't help you with information for the restoration.
Thanks Ivan, appreciate the info on timing. On this one, the seat and back are integral with the frame, and removable, so not separate cushions. Some of the "fancier" versions (all) I've seen have a metal bracket on the back that the support bar rides in. Same function and basic shape, but it's a separate piece.
Kevin
Posts: 38
Threads: 0
Joined: Aug 2013
Location: Northern Virginia
I think I understand what you propose doing. The problem I see is that there's not much meat left in the leg to support the joinery. You'll have a much more solid structure if you can cut out a block that includes the damaged joint, glue in new wood, and then shape to match the original contour of the leg. That does leave you the job of staining and toning the patch to get close to the color of the rest of the chair - tough to sell a contrasting repair piece as a design element in that case. An easier alternative, provided you have a clean break that fits together well and solid replacement dowels joining the leg to the front piece, is to use epoxy to glue the joint back together.
Looking at the way the joint failed, I'm guessing that the weakness resulted from the close placing of the perpendicular dowels at the corner. Even with an intact leg, there's just not much of it around the dowels to make a resilient joint. If you do take the frame apart in front, I wonder if you would do better by placing the dowels as they are to connect to the front piece and using something like a loose tenon in the middle of the joint to connect the front assembly to the side piece. If you want to avoid taking the frame apart, you could achieve something similar with a "through loose tenon" - something like what you were thinking with the dowels you were going to drill through. That's a design element you could match with a faux tenon on the front of the opposite leg.
Dave
Posts: 420
Threads: 0
Joined: Nov 2007
Location: Concord, CA
Dave, I think you understood exactly what I was proposing. I've already cleaned out the leftover wood around the dowels, which are solidly in place still. My next task is to clean up the mess on the leg and glue in a solid chunk and re-drill the dowel holes for the front connection. I am proposing the loose tenon approach, but using the dowels as they are, I hadn't considered a larger single tenon, which might make it stronger, makes a bigger patch/design on the front leg though, thanks for the idea. Regardless, I was planning to match it on the other side as well with a faux patch. Without taking the whole thing apart, and the other joints are all solid, I think this is the best approach. I think a contrasting design for the patch might be better than trying to match the existing surrounding wood.
Likely a this weekend project, unless it continues to be 120deg in my garage.
Kevin
Posts: 1,028
Threads: 0
Joined: Apr 2011
I have a reclining morris chair that I don’t know how old it is but it’s well older than me and I’m 58. There were several failed joints on mine so I completely disassembled it and reassembled. Some dowel joints got new dowels but other than that I didn’t have to repair or replace anything. I did complete refinish on it. I’m keeping it so I don’t care if that devalues it.
Anywho-
Imho it might be worth the effort to disassemble and reassemble as that old glue will fail sooner or later under normal conditions. Some of the joints I reglued with pva and some with epoxy if I determined it would benefit from the extra strength.
Ray
Posts: 5,189
Threads: 0
Joined: Jan 2014
Location: Santa Maria, Ca
I think I would be inclined to disassemble/reassemble as well.
Might be easier to replace the damaged area/piece and re-finish the
chair so that it all matches.
Mark Singleton
Bene vivendo est optimum vindictae
The Laws of Physics do not care about your Politics - Me
Posts: 420
Threads: 0
Joined: Nov 2007
Location: Concord, CA
Well, I've started the process. I've cleaned up and replaced the damaged wood in the front leg piece. and gotten the new dowel holes drilled. I will have through "tenon" dowels connecting the front leg to the side rail as noted above. I've found some plugs that might add some character on the front leg.
Mark, I hear ya on taking it all apart, but the other joints are all really solid so I'm gonna leave it for now. I will be sanding and refinishing the whole chair to help it all match. Fortunately this patch won't be very visible, but I've already started sanding a couple pieces that were loose. Now to get to the rest of it when it gets a bit cooler. It's been over 110 here every day for the past week, making the garage shop much hotter.
Kevin
|
