Posts: 470
Threads: 0
Joined: Jan 2008
Location: Peoria, AZ
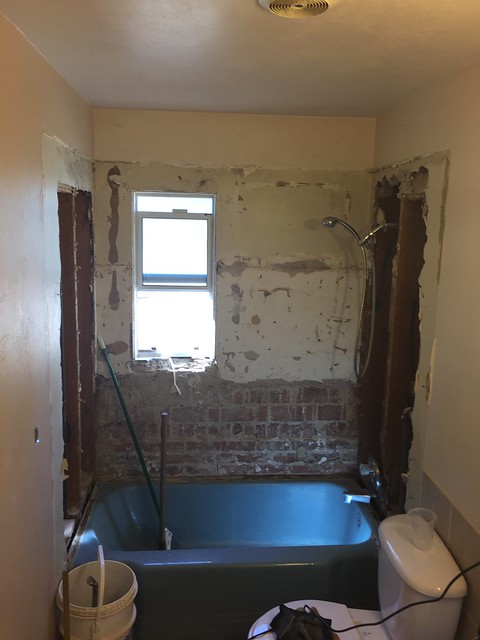
Have a question that hopefully you guys/gals can help me with. I ripped out the tile from my mom's guest bathroom shower due to a leak and on the back wall which is an exterior brick wall, 3/4 of the wall was plaster but the bottom portion under the window was drywalled for some reason and had no plaster. The plaster that is exsisting is in good shape and I don't want to remove that. Should I plaster the remaining bottom section or do as they did before with building it out with drywall/hardibacker board? I've never done plaster before but I'm willing to give it a try unless it's something that needs to be left up to the professionals.
Here's a picture of the situation: <a data-flickr-embed="true" href="https://www.flickr.com/photos/8298745@N08/37423834242/in/dateposted-public/" title="IMG_9545">
</a>
The plan is to put hardibacker board on all 3 walls of the shower, tape/seal then paint on a water membrane (RedGard) but first I need to tackle the plaster issue. Is there anything besides plaster that I can put on the walls to level them out? If plaster is the correct solution, is this a job that should be left up to professionals or can a DIYer tackle this?
Thanks for your input.
Posts: 262
Threads: 0
Joined: Sep 2004
I'd use a backer board, bedded in thinset mortar over the brick portion. Select the thickness of the hardi and thinset to closely match the plaster level above. Redgard over all.
as far as attaching the board, just a few screws into the mortar will hold it until the thinset cures. Maybe use Tapcons instead of the 'normal' screws.
Posts: 1,613
Threads: 0
Joined: Jan 2014
(10-02-2017, 02:15 PM)kencombs Wrote: I'd use a backer board, bedded in thinset mortar over the brick portion. Select the thickness of the hardi and thinset to closely match the plaster level above. Redgard over all.
as far as attaching the board, just a few screws into the mortar will hold it until the thinset cures. Maybe use Tapcons instead of the 'normal' screws.
What Ken stated would/should work well...I would consider an exterior grade stucco system, rather than plaster should you decide to go "old school".
Posts: 31,288
Threads: 2
Joined: Mar 2003
Location: Athens, TN
I'd also go with Ken's suggestion for the substrate. I would also consider using Kerdi instead of redguard. Kerdi is bulletproof for a novice. It is, however, a bit more expensive. Kerdi can go directly over the plaster, so that can save you one layer on that back wall. Kerdi is also perfectly fine over regular drywall.
Rocket Science is more fun when you actually have rockets.
"The Constitution is not an instrument for the government to restrain the people, it is an instrument for the people to restrain the government." -- Patrick Henry
Posts: 5,658
Threads: 0
Joined: May 2005
Location: Centre County Pennsylvania
I did some plaster repair, and I really like working with plaster. But there isn't much info about it available to a diy'er, so I never tried any large areas.
Posts: 19,107
Threads: 0
Joined: Jul 2006
Location: Milwaukee area
(10-02-2017, 09:23 PM)EricU Wrote: I did some plaster repair, and I really like working with plaster. But there isn't much info about it available to a diy'er, so I never tried any large areas.
I'll do larger patches if I can screed the scratch coat.
No way would I wrap around a corner or attempt an entire wall/room. It would be bad.
Posts: 13,086
Threads: 0
Joined: Jan 2010
Location: Lewiston, NY
Are those brick structural? I don't see a single piece of wood on the back wall. How old is the house? Interesting challenge you have there. And very cramped space to work in, too.
John
Posts: 7,421
Threads: 1
Joined: Sep 2005
No insulation on that wall. I would consider moving the tub to allow a stud wall and insulation. A cold bath does not sound very relaxing.
Or a foam backer board. John Manville makes one but they don't call out the R-value.
http://www.jm.com/en/home-insulation/til...d/goboard/
No animals were injured or killed in the production of this post.
Posts: 470
Threads: 0
Joined: Jan 2008
Location: Peoria, AZ
(10-02-2017, 02:15 PM)kencombs Wrote: I'd use a backer board, bedded in thinset mortar over the brick portion. Select the thickness of the hardi and thinset to closely match the plaster level above. Redgard over all.
as far as attaching the board, just a few screws into the mortar will hold it until the thinset cures. Maybe use Tapcons instead of the 'normal' screws.
Thanks for the input. I think this is the route I'll go with.
(10-02-2017, 04:13 PM)Mr_Mike Wrote: I'd also go with Ken's suggestion for the substrate. I would also consider using Kerdi instead of redguard. Kerdi is bulletproof for a novice. It is, however, a bit more expensive. Kerdi can go directly over the plaster, so that can save you one layer on that back wall. Kerdi is also perfectly fine over regular drywall.
If Kerdi is better than RedGuard, I'll go with that. I didn't realize that if I could skip putting hardibacker over plaster and just use a waterproofing membrane. Good to know and that'll save some cost. Thanks!
(10-03-2017, 06:51 AM)jteneyck Wrote: Are those brick structural? I don't see a single piece of wood on the back wall. How old is the house? Interesting challenge you have there. And very cramped space to work in, too.
John
I'm assuming the bricks are structural as the entire house is brick. You're correct that there's no wood on the back wall, hence no insulation beyond what brick + plaster provides. The house was build in 1954. I'm not sure if all the exterior walls of the house are like this? Thanks for replying.
(10-03-2017, 12:15 PM)Cooler Wrote: No insulation on that wall. I would consider moving the tub to allow a stud wall and insulation. A cold bath does not sound very relaxing.
Or a foam backer board. John Manville makes one but they don't call out the R-value.
http://www.jm.com/en/home-insulation/til...d/goboard/
If I move the tub out to allow a stud wall and insulation, I then have to move the toilet which probably will blow the budget for this project but thanks for the input.
Posts: 7,421
Threads: 1
Joined: Sep 2005
(10-03-2017, 01:05 PM)greatscott Wrote: Thanks for the input. I think this is the route I'll go with.
If Kerdi is better than RedGuard, I'll go with that. I didn't realize that if I could skip putting hardibacker over plaster and just use a waterproofing membrane. Good to know and that'll save some cost. Thanks!
I'm assuming the bricks are structural as the entire house is brick. You're correct that there's no wood on the back wall, hence no insulation beyond what brick + plaster provides. The house was build in 1954. I'm not sure if all the exterior walls of the house are like this? Thanks for replying.
If I move the tub out to allow a stud wall and insulation, I then have to move the toilet which probably will blow the budget for this project but thanks for the input.
I would use the Johns Manville foam backerboard in any event. The foam is easier to cut (with a utility knife), and has to have some insulation value. You probably could afford to lose a good inch of the tub top against the wall and put in 3/4" foam insulation under the backer board.
I am in the middle of a remodel too (and my cast iron tub is also that wonderful shade of blue). I had to decide, do I break out the cast iron tube and put in a new acrylic one? Or do I have a professional apply that same acrylic finish over the old cast iron tub. I'm going to have a pro do the finishing.
This from Google:
The average life span of a refinished bathtub (automotive paint) is 1 to 3 years depending on use. High solids aliphatic polyurethane or aliphatic acrylic urethane coatings are typically used on commercial aircraft and when applied properly onto bathtubs and ceramic tile will last up to 10 years.
A 10 years life span from $300.00 worth of refinishing sounds fine to me. This is in a rarely used guest bathroom and I can probably expect more than twice that life span. What isn't fine is leaving it blue.

No animals were injured or killed in the production of this post.


