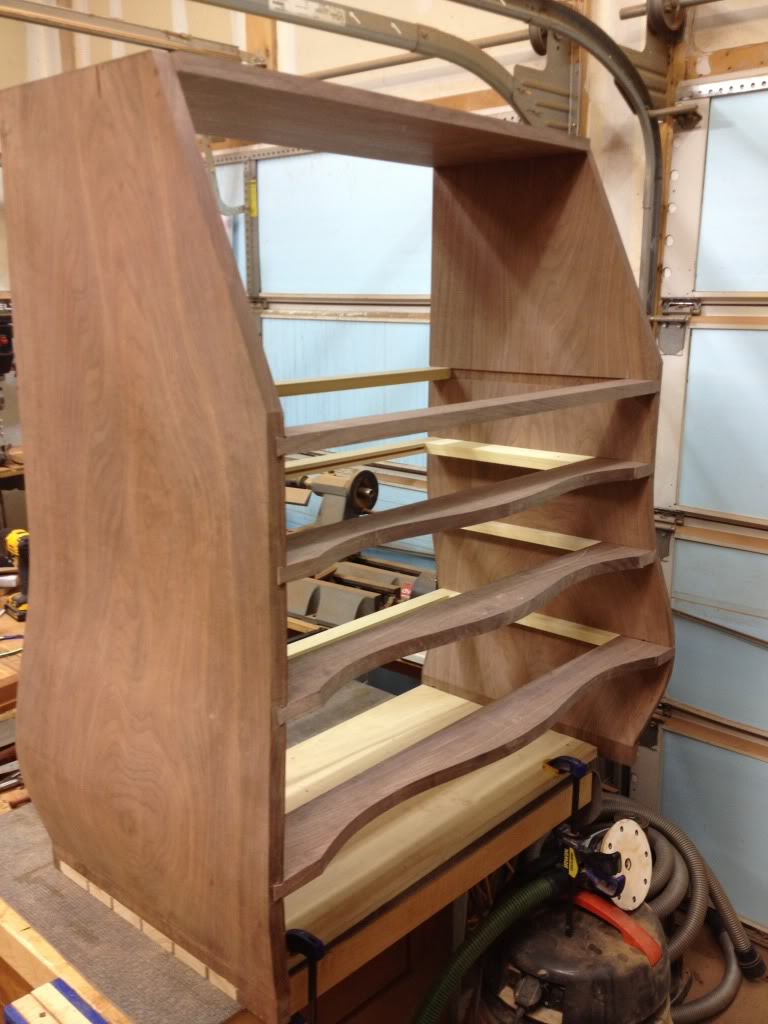
Bombe Slant Front Desk
#21
The next step I was able to get a fair bit done over a week of vacation but I did not take too many process pictures.

Here's what I did.

I laid out the drawer dividers.

Cut the sliding dovetails for the drawer dividers and the writing surface.

Fit the writing surface and the drawer dividers.

Constructed the drawer runners and backs.

Constructed the entire writing surface.

Cut the 3/16" beads in the drawer dividers and bottom of the writing surface

Cleaned out the waste between the beads.

The middle drawer divider had to be done by hand (it's on an angle to match the curve of the carcass front) and it took a few hours to cut the beads and then remove the waste with a chisel and scrapers.

I then dry fit it all together... then disassembled.

At this point I then cut the angle for the writing desk and then glued it up.

Finally I cut the blanks for the bottom molding but I have not gotten around to cutting the profile.

The pictures.


The sliding dovetails were not easy nor pretty.  These were actually the first sliding dovetails that I had ever done.  So needless to say they needed a lot of shims to fill some gaps.


Peter

My "day job"
Reply
#22
Here is the case with the bottom molding board fitted into place.


I cut the profile of the front molding then used a spokeshave and card scraper to smooth the profile after the bandsaw


I spent a lot of time getting the bottom moldings fitted just right into the case.


I glued the floor into the case (I didn't get a photo of that)

Then I routed the molding profile and cleaned up the front molding with some card scrapers.

The case wasn't perfectly square because the solid boards move and cup over the course of the 18 months that I've been working on this.
Because of that movement the miters on the moldings needed some massaging to get them to fit.


As you can see I've got a nice gap to fill along the top of the side moldings. 

The front 6" are glued and the rest of the molding is nailed into place.

I used my workbench as the clamp and a nice platform to get everything set and flat for a the glue up.


Next is a 3/16" bead board to go on top of the front molding.
Peter

My "day job"
Reply
#23
I cut and trimmed some very thing shims. I got these from the cut offs of the side molding stock itself so the wood matches very well.


You can also see some of the big chip out from the router when I routed the molding. As well as the lack of perfect alignment in this mitered corner.

I glued it into place with CA glue. I love it for these types of fixes. It is fast drying especially with some accelerant, it is finish-friendly, and it is very thin so it gets into all the places that I'd like it to go.

I trimmed the shims before I glued them into place.


After some work with a chisel trimming the shim flush and then some sandpaper the gap is gone and nearly impossible to see the fix.

The photo isn't that great but I'm happy with the fix.


I then filled the gaps in the front of the moldings where it covers over the case sides.

Next I had to make the 3/16" bead molding board for the top of the front molding.

I cut a board to size just over 3/16" thick and the edges are mitered to match the curve of the case sides.

I traced the curve of the molding and then I rough cut the shape on the band saw.

I find that a file is great for smoothing out the BS marks. I works fast, leaves a smooth surface and is great at accomplishing a smooth curve because it takes down the high spots. It think files work better than a spokeshave in situations like this.


Then I scraped the roundover profile onto the front of the bead.


A little sanding and then I glued it into place and I was done for the day.


I did take the clamps off but I forgot to take a picture of the finished front.

Next is to make the interior drawer runners and I think I'm going to install a false floor under the bottom drawer to make a hidden compartment.
Peter

My "day job"
Reply
#24

Cool 
Yes
Reply
#25
WOW!! Thats a lot of work but well worth it!! Very nice!!
Reply
#26
I'm glad your posting this again. I love to watch build threads!
Reply
#27
(02-21-2018, 07:10 AM)GlenS Wrote: WOW!! Thats a lot of work but well worth it!! Very nice!!

Thank you,

Right now I'm re-posting the work that I've done a few years ago.

My pictures in the first thread went away and I decided to re-post everything.

I'm enjoying going back through the work that I had done in the past.

Once I get through the work from the past I'll continue with the steps that I've take in the last week.

Thanks
Peter

My "day job"
Reply
#28
(02-21-2018, 09:22 AM)FrankAtl Wrote: I'm glad your posting this again. I love to watch build threads!

You are welcome!

When I first joined there was a purpleheart and maple workbench build thread that someone was doing in the handtools forum.

That was, and still is, one of my favorite threads of all time so I wanted to share something along the lines of what meant so much to me.
Peter

My "day job"
Reply
#29
Peter you are doing a beautiful job.Congrats,keep the pics and updates coming.


Mel
ABC(Anything But Crapsman)club member
Reply
#30
(02-19-2018, 09:46 PM)Gary G™ Wrote: Marzluf cross-cut sled?

https://forums.woodnet.net/showthread.php?tid=2780468

Yes, that is it.  I then realized a jig could be fine furniture,  a work of art
Reply


Forum Jump:


Users browsing this thread: 1 Guest(s)

Product Recommendations

Here are some supplies and tools we find essential in our everyday work around the shop. We may receive a commission from sales referred by our links; however, we have carefully selected these products for their usefulness and quality.