09-20-2018, 07:58 AM
(This post was last modified: 09-20-2018, 02:40 PM by tablesawtom.)
I am sorry for my last post. I have had trouble posting pictures and it was just a trial to see if I could access my pictures. I didn't mean for it to post. So here it goes.
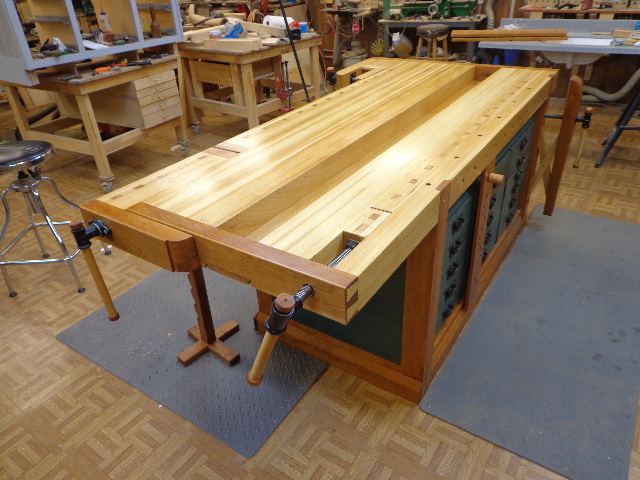
A lot of the bench was inspired by a picture of a Shaker bench from Scott Landis's book The Workbench Book. The bench pictured is in a museum in Hancock. Massachusetts. I actually spent a lot of time trying to match the color and still make that part of the bench look old at the same time.
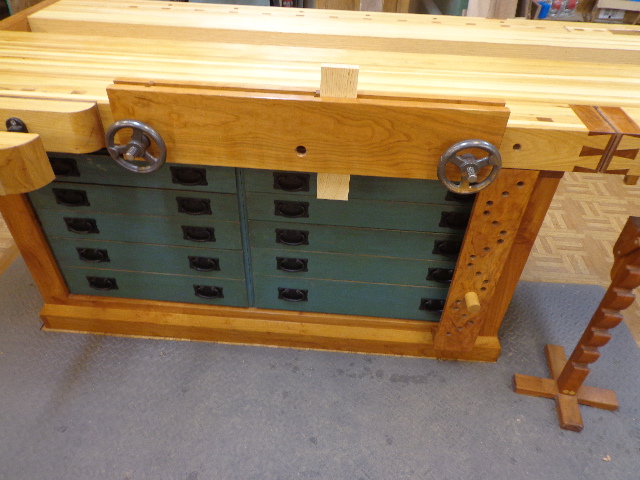
I put the bench to the floor because at my age it is to hard to get down on my hands and knees to find or clean under the bench. Also contrary to what some my think I find that the bench is the number one tool used in the shop. I also like to have my tools that will be used at the bench at the bench. Storage is always a problem and the drawers helped to solve that problem. The one thing I will say is build the drawer to fit what you would like to put in them not to a certain size and then decide what goes where.
I also made a temp. bench. That bench was made out of 2x4s and plywood so I could fit it to the space allowed for it. Drawings cad programs and even cardboard cutouts are nice but there is nothing to actually seeing the actual size up close and personal. I also braced it against the wall and tried hand planning and other operations to get the height right. The height is the most important aspect of a bench and it has to be right to fit you and your stile of wood working.
My bench is 34 1/2 inches high and the mat I stand on is 1/2 inches thick, so 34 is my working height It is almost 8 foot long, My wife said something like will it fit in you pick up, I have a long box so I shortened it so I could close the tail gate.
I know that most everyone thinks that the Roubo bench is the way to go but I prefer the European style with a shoulder vise and tail vise. I also do a lot of glue ups using 24 inch clamps so I like a bench that the clamps can set on. and a split top works well for my style of woodworking. The bread board ends hold it together and are splined so the whole top can expand and contract.
I use either hand equally well and there are times when I would like to work left handed so the back side is left handed. I do not see a reason for a leg vise. My grand father had a bench with one and as a kid of 11 or 12 I couldn't get it to work so that could be some of the reasons why I don't prefer one. Anyway I bought an old fashioned vise screw for 2 dollars at and auction so apart from the cost of the wood and 3 long 1/4 inch bolts I mad pins out of, I have 2 dollars in it. I saw Bench crafted sold cris-crosses so I did some R and D and made my own. And I will say that it is the cris-cross that actually makes the vise operate as smoothly as it does in Bench crafted videos. Not that it doesn't take the whole set up working together. But mine works well enough for me.
The legs and frame are 4x4 cherry and they are solid wood, not glued up. The top is Hickory and it is the last time I will build anything out of Hickory. The painted parts are Eastern White Pine.
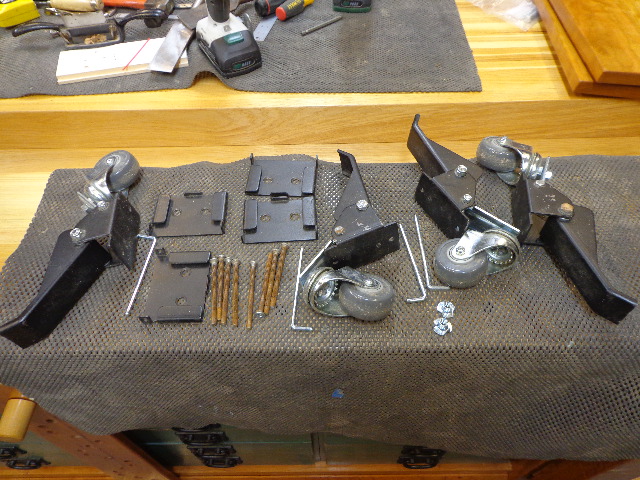
I also added a moxon vise. A shoulder vise works great for a few dovetails but for a lot I like to get up close and personal. The height is the correct height for my elbow and I can turn a little to get the natural swing from my shoulder. The top of the vise is lever, correct plain for eye referencing the cuts. And if you put on the rollers I pit bolts through the legs into threaded inserts. The only problem is they start to rust in a day or to so I would advise using stainless steel bolts I am changing over to them
Anyway, rather than writing a book I will just post pictures. But I will say that the bottom of the tool tray moves for cleaning and all the way out for clamping as you will see in a picture. It was hard to get some pictures because of the finish on the top reflecting light.


I will find a couple more pictures and please feel free to ask questions.
Tom
A lot of the bench was inspired by a picture of a Shaker bench from Scott Landis's book The Workbench Book. The bench pictured is in a museum in Hancock. Massachusetts. I actually spent a lot of time trying to match the color and still make that part of the bench look old at the same time.
I put the bench to the floor because at my age it is to hard to get down on my hands and knees to find or clean under the bench. Also contrary to what some my think I find that the bench is the number one tool used in the shop. I also like to have my tools that will be used at the bench at the bench. Storage is always a problem and the drawers helped to solve that problem. The one thing I will say is build the drawer to fit what you would like to put in them not to a certain size and then decide what goes where.
I also made a temp. bench. That bench was made out of 2x4s and plywood so I could fit it to the space allowed for it. Drawings cad programs and even cardboard cutouts are nice but there is nothing to actually seeing the actual size up close and personal. I also braced it against the wall and tried hand planning and other operations to get the height right. The height is the most important aspect of a bench and it has to be right to fit you and your stile of wood working.
My bench is 34 1/2 inches high and the mat I stand on is 1/2 inches thick, so 34 is my working height It is almost 8 foot long, My wife said something like will it fit in you pick up, I have a long box so I shortened it so I could close the tail gate.
I know that most everyone thinks that the Roubo bench is the way to go but I prefer the European style with a shoulder vise and tail vise. I also do a lot of glue ups using 24 inch clamps so I like a bench that the clamps can set on. and a split top works well for my style of woodworking. The bread board ends hold it together and are splined so the whole top can expand and contract.
I use either hand equally well and there are times when I would like to work left handed so the back side is left handed. I do not see a reason for a leg vise. My grand father had a bench with one and as a kid of 11 or 12 I couldn't get it to work so that could be some of the reasons why I don't prefer one. Anyway I bought an old fashioned vise screw for 2 dollars at and auction so apart from the cost of the wood and 3 long 1/4 inch bolts I mad pins out of, I have 2 dollars in it. I saw Bench crafted sold cris-crosses so I did some R and D and made my own. And I will say that it is the cris-cross that actually makes the vise operate as smoothly as it does in Bench crafted videos. Not that it doesn't take the whole set up working together. But mine works well enough for me.
The legs and frame are 4x4 cherry and they are solid wood, not glued up. The top is Hickory and it is the last time I will build anything out of Hickory. The painted parts are Eastern White Pine.
I also added a moxon vise. A shoulder vise works great for a few dovetails but for a lot I like to get up close and personal. The height is the correct height for my elbow and I can turn a little to get the natural swing from my shoulder. The top of the vise is lever, correct plain for eye referencing the cuts. And if you put on the rollers I pit bolts through the legs into threaded inserts. The only problem is they start to rust in a day or to so I would advise using stainless steel bolts I am changing over to them
Anyway, rather than writing a book I will just post pictures. But I will say that the bottom of the tool tray moves for cleaning and all the way out for clamping as you will see in a picture. It was hard to get some pictures because of the finish on the top reflecting light.


I will find a couple more pictures and please feel free to ask questions.
Tom


