Next in the shop?
#11
Well, right now, I am laid up, with feet problems.....sole have splits in them....not my shoes...my feet
No  makes walking around a wee bit painful.

meds in place for that...have to go barefoot for a few days...

IF I get back to the shop, I have a backsaw to rehandle...
Rolleyes 
   
Disston & Sons, made expressly for Goodell Pratt Co.    4 bolt, 5" x 28" No.4 backsaw.   Wood for the new handle is getting used to being in my  house 
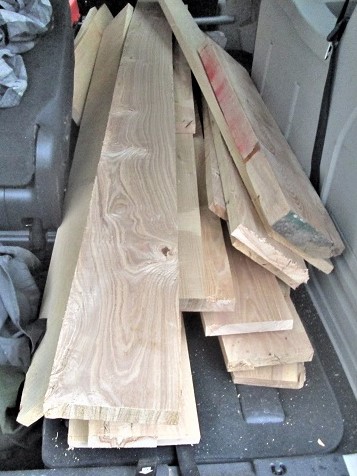
   
That 7/4 x 6" x 3' chunk on top of the rest of the $20 of 1 x 6 Ash...Need to resaw the blank down to 5/4...and cut the blank out.   Then figure out cutting the slot for the blade.  

The rest of that pile?    Something about a new desk, for me.   Desk I have now, I made almost 10 years ago...needs a better set of drawers, and a better "hutch" on top...should be enough lumber there? 

Stay tuned....
Show me a picture, I'll build a project from that
Reply
#12
Bandit, hope the feet heal soon.  Good luck on the saw.  Hope you take us along for the ride on both the handle and desk.
"I tried being reasonable..........I didn't like it." Clint Eastwood
Reply
#13
Got side-tracked a bit....Decided a quick and almost easy project, to keep me from being bored sitting around, was in order....so..
Rolleyes  
   
The OEM deck on the Stanley #2246A was getting a bit chewed up.   used a Yankee 130A to remove the 10 TINY phillips headed screws.  used the OEM deck to mark out a Poplar board that I had....1/2" thick...Slow trip to the bandsaw to cut the shape, and a #3c plane to smooth a few edges....and the back, bottom edge needed a 45 degree bevel along it's length, to settle into the frame's corner at the back...
   

The just completed Stanley #358 was used to cut the walls of 2 dados...and a couple chisels to remove the waste....test fit...recut one a tad wider, and both a tad deeper, test fit 2.....now they fit the stock rests.   Used the stock rest to hold the new deck in place,, re-install the screws...
   
There was a stray bolt..
   
The only place it seemed to fit?
   
Was here....it seems that when you raise the lever to unlock the swing arm, to change the degree setting..a bar on the lever..
   
Pushes up on that bolt...raising the saw guide enough to allow the saw to be above the deck, and not scrape it's way across the surface.   Need to adjust mine...
Waiting on a coat of stain to dry on a level...to see how a darker stain will look on it
   
Minus the $2 price tag....will post an "after" photo, later.....may add a coat of varnish?
Feet are doing a bit better....we'll see
Stay tuned
Winkgrin
Show me a picture, I'll build a project from that
Reply
#14
The "after" picture...
Winkgrin 
   
Also varnished a few handles..
Cool 
   
3 North brothers Yankees, and a Millers Falls made for Craftsman 610A

Red handles are ready to store away..
Cool
   
Show me a picture, I'll build a project from that
Reply
#15
Needed to clear off the saw's top...
Rolleyes
   
And get things ready...need to cross cut a blank, to get the best chunk....and then set up for a bit of resaw stuff...
Rolleyes 
   
Then the bandsaw to complete the resaw...
   
This is the '' cut-off".....had to plane the same burnt area off the "good" blank...just over 5/4" thick on the blank...Meanwhile, got the broken handle of the plate, and cleaned the plate....PBBlaster leaves a nasty crud behind...wide chisel to scrape that off...and..
Cool
   
And I cleaned the brass, as it came off the handle..
   
Needed a pattern, to trace around...hmmmm
Rolleyes
   
Which meant I needed to remove that good handle to trace around it.   Other than the location of the medallions, these are the same Disston made No. 4 mitre saws...one is from a Goodell Pratt saw, the other a Millers Falls ACME Langdon saw...same hardware, too...except, when the handle came off the saw plate...
Confused  
   
Missing some steel?   Traced around the Pattern handle...bandsaw to make the outside cuts..
Cool 
   
And a Forstner bit to remove most of the waste on the inside.   Decided to use an old junk saw handle, and try a repair, as well..
   
Will blend things out, after the epoxy cures.   Dremel and a few sanding drums...and a lot of shaping to do...and a lot of sanding, too.   Then make a cut for the saw plate to fit into..and the mortise for the spine....then lay out and drill a few holes...with counter bores..might take a day, or three?

Stay tuned...
Winkgrin 
BTW: that Millers Falls saw has a very good etch...
   

Cool
Show me a picture, I'll build a project from that
Reply
#16
Hey Bandit,

I couple years ago I decided to take my old Stanley miter saw completely apart and refurb it.

Now looking at all the parts I don't know what the hell I was thinking.  Not sure I can get it back together.  I found a manual but can't find a parts diagram anywhere.

Any suggestions?
Reply
#17
There is a website...timetestedtools, run by Don Wilwol....that has a thread by POA....where the dis-assembly, and the re-assembly are shown..with LOTS of pictures.....follow the step-by-step guide.
Show me a picture, I'll build a project from that
Reply
#18
(06-19-2019, 09:23 AM)rwe2156 Wrote: Hey Bandit,

I couple years ago I decided to take my old Stanley miter saw completely apart and refurb it.

Now looking at all the parts I don't know what the hell I was thinking.  Not sure I can get it back together.  I found a manual but can't find a parts diagram anywhere.

Any suggestions?

Yep mail it to him with return postage and you will be happy you did. 
Big Grin
As of this time I am not teaching vets to turn. Also please do not send any items to me without prior notification.  Thank You Everyone.

It is always the right time, to do the right thing.
Reply
#19
This "treasure" came home with me, today...
   
hey..for two bucks...
Rolleyes   Giving it a good soaking in PBBlaster....then we'll see how it cleans up...

Looks like a Barber style chuck...
Show me a picture, I'll build a project from that
Reply
#20
Cleaned that brace today ....
Rolleyes
   
Look any better?
Confused   ratcheting was rusted up...managed to soak most of the rust out....was finally able to move the 2 pin selector...
Cool  
   
Jaws came out, with an intact spring...got those cleaned up, and back in place...
Cool
   
Could barely make out any markings on the arm.....MIGHT be a PS&W CO....
Confused
Confused
Confused
   
Handles are stained hardwood....tried out a round shank drill bit...
Cool
   
There is a hole at the top handle...either for oil...or for the ball bearing to fall out.   only has 2 screws to attach the wood..
Confused
   
Hey...for $2?   Not too bad?
Confused
Show me a picture, I'll build a project from that
Reply


Forum Jump:


Users browsing this thread: 1 Guest(s)

Product Recommendations

Here are some supplies and tools we find essential in our everyday work around the shop. We may receive a commission from sales referred by our links; however, we have carefully selected these products for their usefulness and quality.