Posts: 3,718
Threads: 0
Joined: Nov 2010
Well..I'll skip the part where I used a Router Table to mill the pins first.
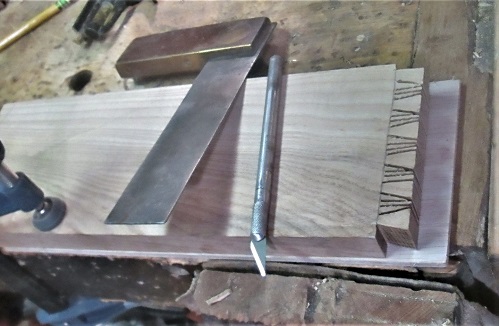
 ...go to chopping..first a way to lay these out...

Clamp the drawer front to the bench so it don't move around...clamp a shim to raise the drawer side high enough...then stand the drawer side up, mark where the tails will be...and where the baseline will get abused at...

Switch things around a bit, stand the drawer side up in the vise...
bevel gauge, set to the angle of the dovetail bit...to check on the markings...correct a few wavy ones..then
Use a square to carry the baseline all the way around...then over to the bandsaw, and make a few cuts..staying in the waste side of the lines..
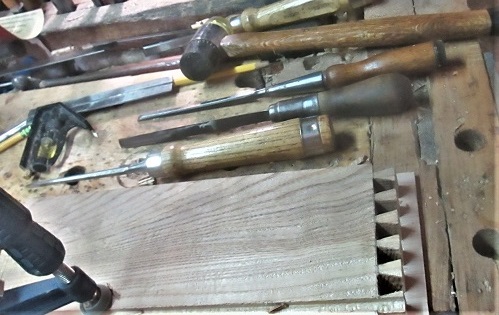
Then back to the bench, and make a knife wall..plywood scrap under the board to protect my bench...get out a few chisels..and..
I call it half chopped. One side is chopped just a bit, more to prevent any blowouts when I chop from the other side..flip the board over..
Complete the chops..That Lutz chisel worked great in the corners, BTW....then a test fit?
When you NEED the mallet to drive these home...should be about tight enough...repeat the above for the other side....
Either I needed a BIGGER hammer...or...I forgot to square the sockets back to the baseline on the drawer front...

Checked the back for size..
Hmmm, need to plane a bit off?
Took a few test fits to get it just right....
Stay tuned for part 2...

Show me a picture, I'll build a project from that
Posts: 3,718
Threads: 0
Joined: Nov 2010
Once the back fit just right..I could cut the plywood bottom to size....and try a dry fit for that...(good luck
 )..
Hmm, time to get out the brush and bottle...
Brush to moosh the glue around where it NEEDS to go....and my fingers and the floor don't count
 ...then off to the Forest of Clamps...
Let this sit a day...
Friday: clamps did come off....cauls took a whack to get them to leave.....had a couple proud dovetails to plane down flush...one of two spots to fill..tried to slide the drawer into it's new home....drawer front was hitting the divider below it? We have ways..
One or two tries to get this..
Just needing a handle....slides right in. Drawer #5 front...was a bit on the rough side, both faces...again, we have our ways...

BOTH faces were planed smooth AND flat....then the front got it's groove thing going...

And..that was it for today...working to hard for a Friday..

Stay tuned...

Show me a picture, I'll build a project from that
Posts: 3,718
Threads: 0
Joined: Nov 2010
In response to a few complaints about the size of the handles...
I think I have enough for the last 2 handles..

Hmmm...

Show me a picture, I'll build a project from that
Posts: 2,336
Threads: 0
Joined: Jan 2008
Location: Irving, Tx
Good move on switching the handles.
"I tried being reasonable..........I didn't like it." Clint Eastwood
Posts: 21,254
Threads: 2
Joined: Mar 2009
Location: IA
(07-30-2021, 07:05 PM)bandit571 Wrote: Ok...glue joint needs a jointed edge...set up to do just that...

Jointer Plane?
A Stanley No. 6....seemed to work well enough...nothing fancy..Then test for any gaps..
Finding none, I worked on the other wide board a bit..then recheck...
No glue or clamps, just yet.....set up the tablesaw as an assembly/glue-up table....pipe clamps, glue, and cauls with their c clamps...
To keep the panel flat...this can sit here a day or so....allows me to work on the second panel...getting it ready for a glue up, as well
Same as before...joint the edges..check for gaps...
Joint the next glue line, and recheck
Bring out some more clamps, some glue, and a few more cauls..
caul in the center? Center strip was a bit out of line, used the cauls and a BIG clamp to pull it in flat. Let this sit a day or two.....
Now have 2 panels....3/4" x 13" x 23-1/2".....will be the slab sides of the chest.....will need to free up the tablesaw, as there is a LOT of ripping to do...
Have drawer dividers to size, length, width, thickness...that sort of thing....storage compartment under the lid will need a "front" and a "back" milled. Drawer guides need milled, as the drawers will need something to slide on. Thinking sliding dovetails?
 Need a rebate along the back edges, to house a plywood back.. Need a rebate along the back edges, to house a plywood back..
Then, worry about drawers...

Stay tuned..

How do you remove the wooden cauls when the glue sticks to them and the boards you have?
As of this time I am not teaching vets to turn. Also please do not send any items to me without prior notification. Thank You Everyone.
It is always the right time, to do the right thing.
Posts: 3,718
Threads: 0
Joined: Nov 2010
Just a simple whack with a mallet seems to work quite well...

Show me a picture, I'll build a project from that
Posts: 3,718
Threads: 0
Joined: Nov 2010
Drawer #5, aka The LAST drawer....is sitting in the clamps, right now...3 hours IN the shop, while also on "Laundry Detail"...
Drawer sides were planed smooth...
As they were a bit too rough...that ain't curl...sorry...

Then decide which face to plough a groove in....
I guess it depends on grain direction...whether you get a lot of chips, or
A ball of Pho Noodles...
Dados were next.....clamp a side to the bench, drag the Stanley 45 type 4 backwards on one end....spurs still aren't scoring deep enough, so...over to the Stanley 358 mitre box, and make them deep enough...then back to the bench, and let the 45 do it's thing..

Then, make sure I have the correct end on the other drawer side, and repeat...Then, it was time for that router table, again...I guess this is doing "Pins" first?
This is the last of the sockets being milled...then I can put the router table away....
Then get out the usual crew of chisels...one needed sharpened back up a touch...then the dry fits...
As before, I set things up to trace the sockets onto the drawer sides, to cut the tails...bandsaw to make a bunch of cuts..

One of these years, I might just get the hang of doing these? Needed a mallet to install..
End of part one ( washing machine done, move the load over to the dryer..)
BRB...


Show me a picture, I'll build a project from that
Posts: 3,718
Threads: 0
Joined: Nov 2010
Ok, with both sides dovetailed and fitted...I can cut the plywood bottom to size, and see how close I got..

Needed to scrape that BAR code label off...looked around for a board to be the back of the drawer.....
 ,Hmmm, cross cut a plank for length ( plywood for the size markings) then rip for width....Finally reset the blade and fence to resaw to close to the thickness needed..
No handsaw needed, this time around.....however, I still hand to plane a bevel on the ends, to fit the dados...
Fits. One drawer side (right one) was leaning out at this picture...clamps closed up that gap.....scrape that label off, get things ready to glue up''
Brush to spread the glue around, and a glass of water to toss the brush in.
Bottle of glue, and a mallet...as the dovetails get "hammered in" done on the bench..then move to the tablesaw (been cleared off) and start the bottom into place.
Drawer back gets glue on the ends, and along one edge. and is slid into place.
Then into The Forest of Clamps...no cauls, this time...

Too many? Nah, can never have too many clamps..right?
Used a few 6" H-F clamps along the back, to clamp the bottom to the back better..
Let this mess sit a day...while I start to figure out a lid...

Stay tuned

Show me a picture, I'll build a project from that
Posts: 3,718
Threads: 0
Joined: Nov 2010
Drawer #5 is NOW out of the clamps, clamps put away ( for now, anyway) and slid into it's new home....no issues noted.
 ..other than the lack of a handle ...on both it and Drawer #4....

Single Brain Cell Sketch Up has come up with a "Plan" for the lid...
 ...so...I had to haul another LONG plank to the shop, this morning. Needs cut into three sections..at ..
3/4" x 5-3/4"x 24-3/4"....edges will need jointed, then glued up into a panel.....and that should do it...for today's Shop Time...

Film at 2300 hrs...

Show me a picture, I'll build a project from that
Posts: 3,718
Threads: 0
Joined: Nov 2010
Hmmm, I guess there were "issues" with drawer #5..Gaps needed filled..
Went to slide the drawer all the way in....discovered a high spot on one corner..
Then needed to carve a starter curve on the back corners of the sides...
Tends to help when trying to slide a full drawer into it's place...
2 handles to install..should have been easy, right? Wrong, they fought the entire way.even had to cut 2 bolts down because they were too long..drill bit wanted to wander around.
 ..even with a small pilot hole...somehow...
Managed to get them both installed...

Other task for today...cut a plank into 3 pieces...more ore less the right length...I hope..
Edges were rough, and they had a slight taper...
Buzzed off the worst of the 2 edges. reset the fence as needed to get them parallel...then laid things out, to match up the grain...
Close enough....then Pipe clamp time...
2 under, 1 over....then som c clamps and cauls, once the pipe clamps were tight....let this sit a day or 3....
Beginning to call today's work The Sunday Funnies.....

Stay tuned..

Show me a picture, I'll build a project from that
|
 ...go to chopping..first a way to lay these out...


 ...go to chopping..first a way to lay these out...


 )..
)..

 Need a rebate along the back edges, to house a plywood back..
 ..even with a small pilot hole...somehow...