Barn Sale, this morning
#11
Spent $10 for my item, The Boss spent $5 on her items ( fancy rugs).....so...

We have work to do....
   
Gear end..and..
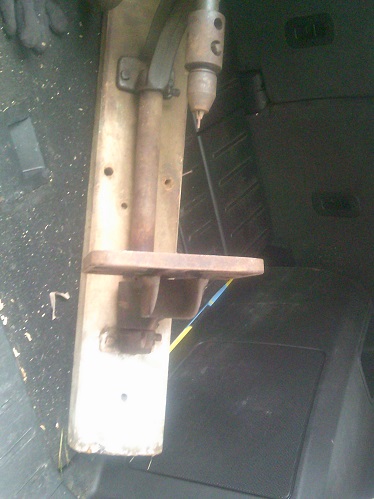
   
The "Table" end.....

Only missing a spring for the Auto-feed prawl...
   
And need to free up the chuck...and toss out that broken drill bit...
   

Right now, have a 20 pound weight limit.....and one eye has had cataract surgery....the other eye gets worked on on 10 OCT 23....got out of the Hospital a few weeks ago...right leg had a BAD infection...been a rough September...might be Mid October before I can get any Lumber for the shop.....

Once I can get that drill press down to the shop, I can start the rehab work....
At least I was allowed (Finally !) to drive the car, today...

Stay tuned..
Cool
Show me a picture, I'll build a project from that
Reply
#12
Nice project Bandit.  I've never had the chance to use one, so that's on the "bucket list".

I thought my Sept. was tough...doesn't compare to yours!!!  Wish you the best and a speedy recovery.
"I tried being reasonable..........I didn't like it." Clint Eastwood
Reply
#13
Bandit, is it a Buffalo Forge?
Reply
#14
It is a Champion Blower Forge from before 1920.  Plank seems to suggest it is a Model No. 90.....
Show me a picture, I'll build a project from that
Reply
#15
Very cool. It's also on my list someday. Looking forward to your restore. Hope you're back to feeling well soon.
Reply
#16
Still a work in Progress...
   
Will need to replace one bolt.....Long ago, someone else had sheared off the bolt that holds the crank handle in place...had to drill it out, and use an Easy-out to remove it...

Colour?    For now, it is a Light Primer Gray....

More photos later today...
Show me a picture, I'll build a project from that
Reply
#17
Lets start with that table..
Bottom of which was cleaned up, and given a coat of light gray primer
   
Table top was sanded clean and flat...
   
The table sits on an arm..
   
That also was cleaned up and Primer coated...arm has a split with a bolt to tighten the arm to a steel column..
   
There are 6 lag screws. and an end cap
   
2 lags to hold the cap in place....cap supports the bottom end of the column...there is a square headed bolt to lock things into the cap...
   
I raised the table up a bit, to center a drill bit on the center of the hole in the table....Table can be set to about any height needed..

I remove the plank from the Post Drill Frame....and beltsanded all the junk/old finish off, except for..
   
They stenciled a Model Number on the upper end of the plank....No. 90....Large hole is from where a lag screw was used to attach this to a post in a shop

After the beltsander was done, then the hand planes finished up..
   
Including the bevel corners and along the edges..
   

Bottom end of the plank was a bit rotten....squared a line across, hand saw to make a cut...block plane to re-champfer the corners...good as new.
Almost time to re-assemble?   Not quite....

Stay tuned..
Show me a picture, I'll build a project from that
Reply
#18
Alrighty...repair work.
   

Crank Handle:   Bolt holding the handle in place had been sheared off...1 thread high.....drilled it out enough for an Easy Out to remove the "remains".   Took that to Lowes, to find a replacement bolt.    Wound up with a allen head cap bolt (?) 3/8" x 16 x 1-1/4" long....takes a 3/8" Allen wrench, too.   NOW the handle will stay put!


Gaposis:
   
Seems the shaft the crank gear rides on, wanted to exit....Once I finally just removed the gear...
   
Noticed this end had threads.   Then, once the crank handle has been removed...that shaft just dropped right out.   Hmmm, what was hidden by the handle, was a LARGE slotted bolt and a washer.   Removed those 2 items. and wire-wheel them all clean and smooth..Threaded shaft needed to be install by itself..
   
Should have used a dab of Loktite?  Went into that threaded hole, and got torqued down tight....THEN the drive gear slid onto the shaft...then the bolt and washer ( with some 3in1 oil on the washer) was installed....
   
No more gaps...gears mesh nicely. 

Next task?
That would involve the Auto-feed arm..
   
As it does not stay on the cam in the drive wheel...so...back to Lowes..

Bought a spring, and some self-drill screws.   Will drill a hole into the arm, slip one end of the spring into that hole.....then the self-driller for the other end of the spring.   Set things to return to the lowest part of the cam's lobe....as the cam rotates, it will force the arm up...and then back down...Lever at the upper end is just Gravity  feed...you can flip it up, and out of the way, when you need to retract a drill bit from a hole. 


handle for the feed wheel.....loose, bolt was bent.....took the square nut off, cleaned it up.   Straightened the bolt. gave the wood a wiped down with a bit of 3in1 oil. 
Hardest part was tightening the nut back on....wasn't much to grab onto on the Carriage bolt head...

Stay tuned...
Show me a picture, I'll build a project from that
Reply
#19
Fun project.  Looks like the gears are in pretty good shape from what I can see.
Reply
#20
I ran into one of those at a home inspection a few weeks ago connected to a basement column. The things I see and can't bring home.
Neil Summers Home Inspections


" What would Fred do?"

... CLETUS


Reply


Forum Jump:


Users browsing this thread: 1 Guest(s)

Product Recommendations

Here are some supplies and tools we find essential in our everyday work around the shop. We may receive a commission from sales referred by our links; however, we have carefully selected these products for their usefulness and quality.