Something for August
#31
Rehabbed a Brace Drill this morning..that I "picked" for $3...
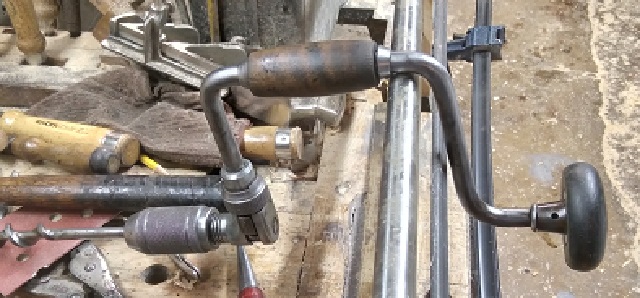
   
Stanley No. 945-10in.  decided to give it a test drive...chucked a #12 bit into the now working chuck..
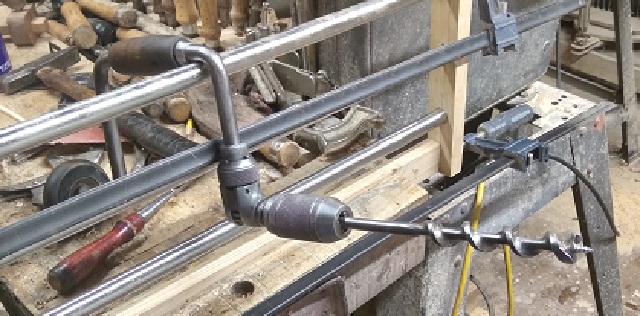
   
Ratchet was frozen..drill was a mess, actually..
   
And the rest of Friday's pickings...

So, what does all this have to do with the Project at hand?
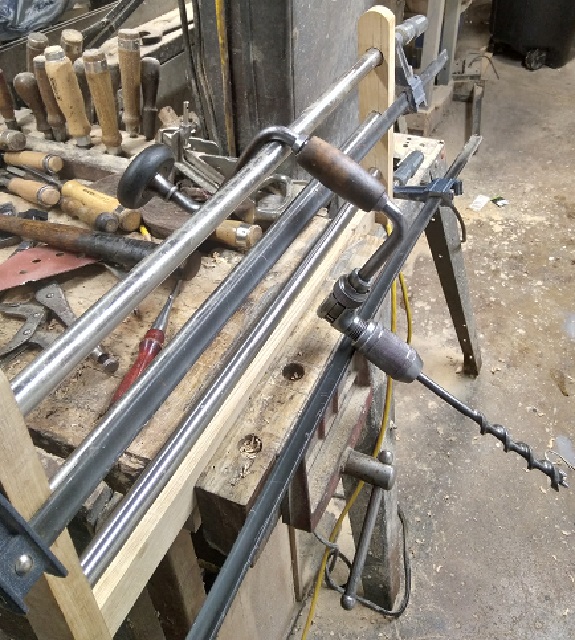
   
I needed to drill 6 holes, 3/8" or so deep...with that 3/4" bit...to house the 3 rods for the fold down towel rack..
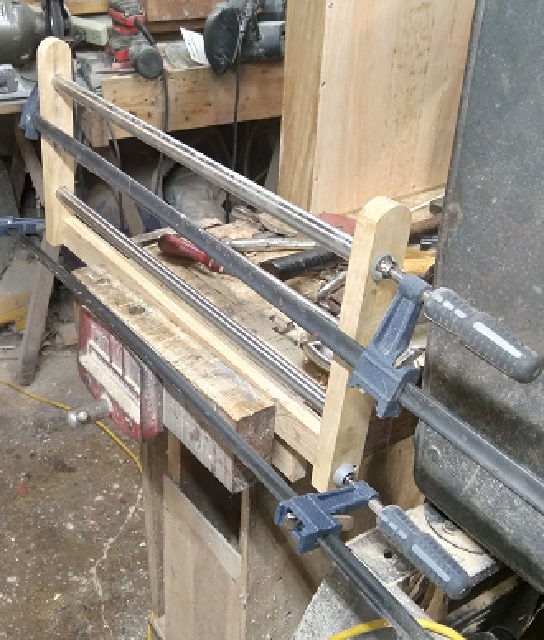
   
Which is now sitting in the clamps while the glue sets up..

Had to cut the rods down about 2"....and make sure they were all even.

Need to work on hanging the 2 doors next time in the shop...and add a Top Shelf...and decide on a finish other than paint...

Stay tuned..
Show me a picture, I'll build a project from that
Reply
#32
Ok..got bored this evening...so..hauled a plank to the shop...

The 1 x 6 was a bit too long..cut it for length.   One edge was stuffed with nasty looking knots...and I didn't really need the full 5-1/2" width. anyway..buzzed the knots off, then skimmed the rough edge, too....bandsaw to cut the "front" 2 corners into a radius...

sanded all the rough spots down..both on the plank, and all the way around the Case....wanted a nice flat surface for the glue up..
   
Since the existing also has this shelf.   kept it flush with the back of the case...since both will be against the wall, anyway..

Glue and screws to fasten it down...screws coming up from INSIDE the case..bTW


Reset the Router, and milled a cove detail..
   
Again..no need to do the back edge. 

Then decided to get a start on fitting the 2 doors in place...
   
Trying for a small lip along the bottom edge of the doors, to open them up with...

Next time I am in the shop..
   
Will try to install a few hinges...including the pair for the Towel Rack...
Stay tuned...
Show me a picture, I'll build a project from that
Reply
#33
So....yesterday being a Monday...
   
Decided to take the day off....was a very BUSY weekend.

So, today...after Brunch has settled it's way through the system....I have doors to do...clean them up a bit ( dirty hands, yuck) and see about hanging them on some hinges...

Will use a shim along the top edge of the doors...to give a wee bit of clearance when they close...might also add a 5 degree back bevel along the meeting edges between the two doors? 

Supposed to be a small lip along the bottom edge..so one can open the doors without needing a knob...we'll see...

Finish?  Will be a coat of Witch's Brew stain...and a couple coats of "Warm Gloss Poly"...to match what is already in the Bathroom...

might even get that Towel Rack installed?  

Stay tuned...
Show me a picture, I'll build a project from that
Reply
#34
So..sand a door clean, get it squared up..set it aside for now...need a simple tool kit, today..
   
Should do the trick...Set a 1/4' "shim" down, set the top of the door up against it...lay out for 2 hinges...carry the marks down from the edge of the door and onto the side of the case...set the door out of the way..and start chopping a mortise for a hinge on the edge of the case...
   
Case needed to be clamped down to the bench...didn't want it hopping around...Yes, I used that hammer to drive the Aldi's chisel...I also pared with that chisel...checking to make sure I am deep and flat enough..
   
Then do the second one on the case...

Next, double check the marks as to where the hinge will be...lay out on the back of the door...clamp the door to the bench...and chop away...once the hinges fit...decided to attach the hinges to the door...needed pilot holes...so..
   
I hold the hinge where it is suppose to go,,the bit self centers itself in the hinge..I drive the pin down with the hammer..until the pin stops....repeat for all the rest..
   
A bit of candle wax of the threads..and a cordless drill to drill the screws home...

Bring the case back to the bench, and add the screws...
   
Then close the door to see how it works...
   
It WILL slam shut IF you let it...
   
The reason behind the "off-set"?    1).  Doors can not rub the top shelf..and 2). it creates a finger pull to open the doors with...

Toes went cramp-city..time to stop for the day...90 minutes seems to be about the time limit, lately...so..next time period in the shop..
   
I get to do this all over again.    Tomorrow is PayDay..so, I will be buying a tube of Stain-able Wood Filler for the inside of the doors...and see IF I need a brush or 3...

Must be getting slow in me Dotage...90 minutes to hang one door?
Stay tuned...
Show me a picture, I'll build a project from that
Reply
#35
Just puttering around in the shop...and..
   
Door #2 was installed...and..
   
They both work as designed...
   
Still have to install the Towel Rack..
Simple enough..will need just this..
   
Maybe tomorrow, I can install those, and then start on sanding....sanding...

At least all the gaps have been filled..Maybe Saturday, I can get a coat of Witch's Brew brushed on?
Show me a picture, I'll build a project from that
Reply
#36
Towel Rack:
   
Installed...

Latches for the doors, so that they will stay shut..
   
Case IS upside down in the vise, as a 3rd hand..as it was easier to install these,,,
   
And...easier to mark where the plates were to go...
   

As for what is next?


Stay tuned....
   
Laundry Detail, today..so boring watching stain dry...
Show me a picture, I'll build a project from that
Reply
#37
Found some chains to use...as using a shim would act as a fulcrum  and not add any support...so...while waiting around on the Boss to get "done" this morning..
   
Made sure both chains were the same length...found 4 screws to install the chains with..held the Towel Rack  Level and added a chain on each end..then checked to make sure the chains would just fold up, when the Rack is raised up and put away...just enough room between the sides of the case, and the sides of the rack..

Will try to varnish this thing, later today....trying to decide how much the insides will get...IF I do the entire insides first, I then will have to wait until THAT dries, BEFORE I can varnish the outside....we'll see...
Show me a picture, I'll build a project from that
Reply
#38
Insides were varnished, except for the plywood back panel...allowed to dry over night...
This morning, after all the running around was done...
   
Closed the doors, and varnished the outside of the case...one magnet was stuck..had to free that up, so the right side door would stay closed...

Tomorrow....will try to get this thing hung up on the wall...we'll see...

stay tuned...almost done...
Show me a picture, I'll build a project from that
Reply
#39
Hmmmm..something seems to be missing?
   
Needed to scrub the walls a bit, anyway...

So...took 2 people to get the new case hung up on the wall...
   
Hammerdrill to drive 2 lag screws back in place...used the same holes the old case used...
Then unfold the Towel Rack..
   

I did try to get a shot of the doors closed up...hand-held phone camera...came out a bit on the FUZZY side...might try for a better shot, later?

Otherwise, this Project is Completed! 

Thanks for looking in!
Show me a picture, I'll build a project from that
Reply
#40
Leveled the case...and took better photos..
   
Was almost a full bubble off...now is dead level...
Show me a picture, I'll build a project from that
Reply


Forum Jump:


Users browsing this thread: 2 Guest(s)

Product Recommendations

Here are some supplies and tools we find essential in our everyday work around the shop. We may receive a commission from sales referred by our links; however, we have carefully selected these products for their usefulness and quality.