Posts: 450
Threads: 0
Joined: Apr 2013
Hello, all. Hope this finds you all well.
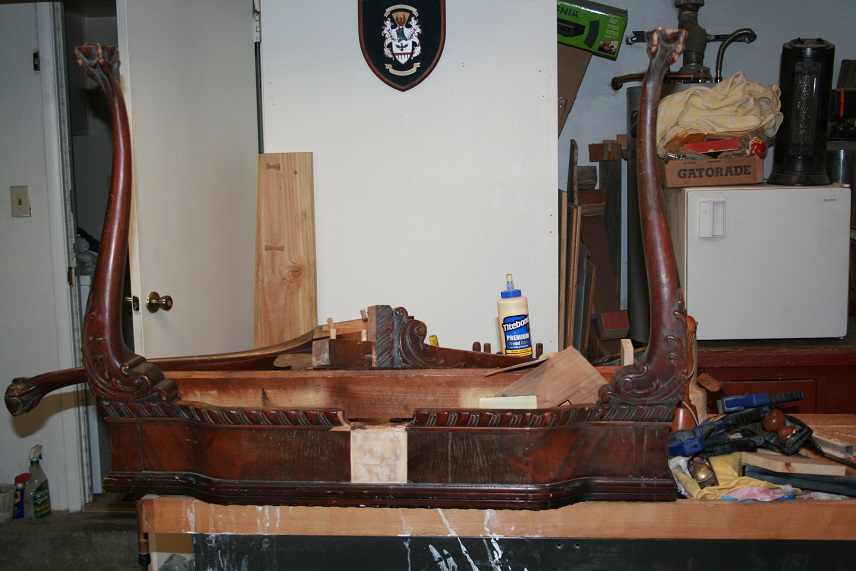
I am mid-restoration/repair of a really nice olf mahogany table a friend of mine inherited. It was a wreck, but I have it mainly under control.
I'm just looking for advice on how to cut these small pieces of trim. All told, I will need about a foot of it to replace where it is broken or missing.
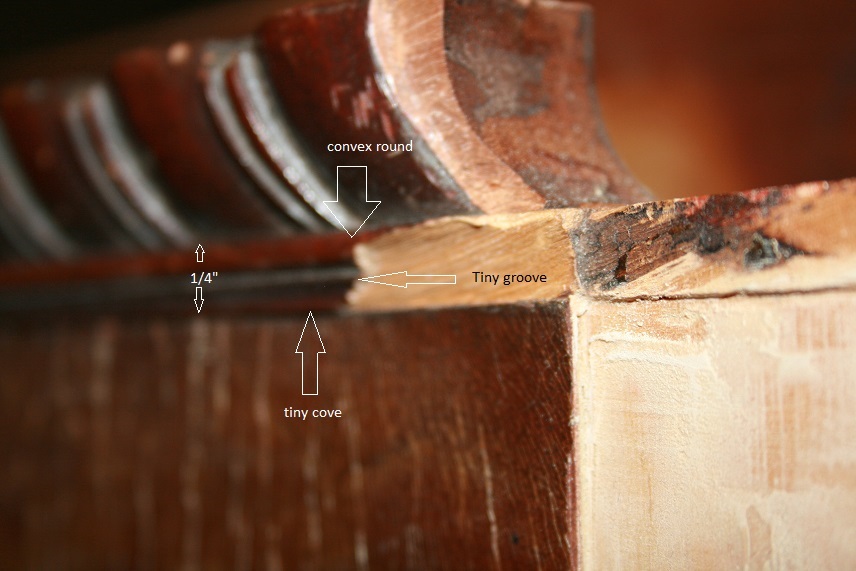
All I have figured out so far is to go ahead and carve it into a big mahogany block and then saw it off at the appropriate dimensions for width and thickness. What I actually have no idea how to do is to carve such a tiny profile. As the second picture shows, it is a quarter round about 1/4" tall. It's upside down in the picture, so, working from top to bottom in the picture, it is a convex round, then a tiny groove, then a tiny cove, so that the whole has a gentle S profile, more or less.
I have carving gouges. They all seem a bit too big to do this profile. I could probably manage, but I am just wondering what is the "correct" way to cut this trim?
Thanks.
If you're gonna be one, be a Big Red One.
Posts: 5,387
Threads: 0
Joined: Jan 2014
Location: Santa Maria, Ca
Make a profile of what you need and then a scratch stock from that.
Mark Singleton
Bene vivendo est optimum vindictae
The Laws of Physics do not care about your Politics - Me
Posts: 450
Threads: 0
Joined: Apr 2013
03-06-2018, 08:35 PM
(This post was last modified: 03-06-2018, 08:36 PM by MattP.)
(03-06-2018, 08:29 PM)MarkSingleton Wrote: Make a profile of what you need and then a scratch stock from that.
heh, now I feel like an person (begins with an i and ends with a t). Of course that is the correct way to do it. Thanks, Mark.
If you're gonna be one, be a Big Red One.
Posts: 5,387
Threads: 0
Joined: Jan 2014
Location: Santa Maria, Ca
Hey, I'm the guy who spent twenty minutes in his shop today looking for something
that was right in front of me!!

Mark Singleton
Bene vivendo est optimum vindictae
The Laws of Physics do not care about your Politics - Me
Posts: 6,562
Threads: 2
Joined: Sep 2006
Location: North Florida
If I were doing it, I would use H&R planes to make about a foot of trim and then cut it to fit. Another way is to glue a block of wood into place and just carve it by hand. But there is a temporary way. You can use tinfoil to make a mold for a piece of paraffin wax trim. Then you can paint the wax and glue it into place as a temporary fix. I fixed a picture frame that way and the temporary fix worked for years.
===---===---===---===---===---===---===---===---
Please visit my website
splintermaking.com
Posts: 24,170
Threads: 2
Joined: Sep 2003
Location: Missouri
(03-06-2018, 08:29 PM)MarkSingleton Wrote: Make a profile of what you need and then a scratch stock from that.
+1
Steve
Mo.
I miss the days of using my dinghy with a girlfriend too. Zack Butler-4/18/24
The Revos apparently are designed to clamp railroad ties and pull together horrifically prepared joints
WaterlooMark 02/9/2020
Posts: 13,485
Threads: 0
Joined: Oct 1999
Check out the “Skill Building” section of my website, I have three videos on making and using scratch stocks, and on making your own blades. Making a Scratch Stock
The scratch stock is the perfect tool for this.
Posts: 450
Threads: 0
Joined: Apr 2013
03-25-2018, 05:50 PM
(This post was last modified: 03-25-2018, 05:51 PM by MattP.)
I started in on making my scratch stock almost immediately after Mark gave me the head slap I needed. But real life got in the way, and I was temporarily overwhelmed with paying refinishing jobs, so I had to set aside this project (which is an unpaid favor for a friend). Able to catch my breath today, and I finished up the project.
The fence is a mahogany block. I didn't notice until I had it selected and roughed to size that it had a split in it. So I took some scrap tulipwood and glued it on the bottom where the split is. Then I realized that very hard tulipwood made a much better bearing surface for the thumbscrew that holds the arm in the fence than the walnut I had picked out to be the arm, so I glued a second scrap on there, too. So it is mahogany and tulipwood on the fence and walnut and tulipwood on the arm. The cutter is a piece of a Crown card scraper I never use.
Just finished it with some BLO.
It has a bunch of serious mistakes, but it is functional, and I'm actually pretty happy with how it came out.
If you're gonna be one, be a Big Red One.
Posts: 22,936
Threads: 0
Joined: Feb 2005
Location: Regina Saskatchewan Canada
That's a pretty flash scratch stock. Nicely done.
Blackhat
Bad experiences come from poor decisions. So do good stories.
Posts: 4,133
Threads: 0
Joined: Oct 2009
Location: Lawrence, KS
(03-25-2018, 05:50 PM)MattP Wrote: I started in on making my scratch stock almost immediately after Mark gave me the head slap I needed. But real life got in the way, and I was temporarily overwhelmed with paying refinishing jobs, so I had to set aside this project (which is an unpaid favor for a friend). Able to catch my breath today, and I finished up the project.
The fence is a mahogany block. I didn't notice until I had it selected and roughed to size that it had a split in it. So I took some scrap tulipwood and glued it on the bottom where the split is. Then I realized that very hard tulipwood made a much better bearing surface for the thumbscrew that holds the arm in the fence than the walnut I had picked out to be the arm, so I glued a second scrap on there, too. So it is mahogany and tulipwood on the fence and walnut and tulipwood on the arm. The cutter is a piece of a Crown card scraper I never use.
Just finished it with some BLO.
It has a bunch of serious mistakes, but it is functional, and I'm actually pretty happy with how it came out.
Looks good. Pull that profile stock up in close to the beam so it doesn't have quite so much flex when "scratching" and you should get a better surface. It may start to chatter of you work with it hanging out so far.
Good luck fabricating the replacement parts.
Don't sweat the petty things and don't pet the sweaty things. -- G. Carlin
|


