Something to build with
#21
Time to get caught up, a bit....back of the desk needed planed...
   
Junior Jack took care of that...
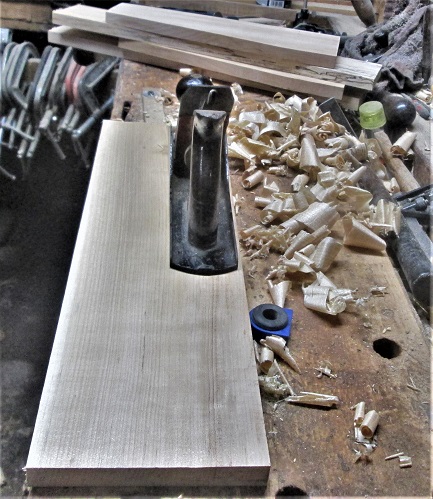
   
Then marked the board for width...
   
Was kind of hoping  I'd get rid of that knot...oh well...set this in the vise..
   
Joint the edge down to the line....leave this sit a spell..

Dig out the Socket Maker..
   
That fence was going to get moved quite a few times..
   
Sockets done on all four ends....ready to be traced around, to make the matching Tails...

Stay tuned..
Show me a picture, I'll build a project from that
Reply
#22
Friday night..got bored...decided to put in a little more shoptime...until the cramps return...

Traced around a set of sockets...
   
Fine tuned the traced lines with the bevel gauge/square..take the board over to the bandsaw..cut on the waste side of the lines ...
   
Back to the bench, cut a knife wall, then chop a bit on the show face..
   
Flip the board over, and finish the chopping..
   
Test the fit...
   
There was an issue with one of the sockets not quite deep enough....fixed that one.

Repeat for the other end of this board..
   
This time around, 2 out of 4 sockets were not deep enough....grrrr..
   
By this time, I was getting a bit sore....decided to put a couple clamps on things..
   
And see how things are looking...and that was it for Friday night

Stay tuned..
Show me a picture, I'll build a project from that
Reply
#23
Saturday...after the yard got mowed, after the weeds were whacked....after the Boss was taken to Wal E World and back...THEN I spent a little bit of shop time..

Tracing more sockets..
   
Bevel gauge to "refine the lines" to I can see them,
   
Then the bandsaw, to cut on the waste side of the lines...trying to leave the lines...
   
Add the knife wall...first chops are on the "show" side/face..
   
Just enough that there won't be any blow-outs, when I chop from the other face
   
Then, try a test fit...starts well enough..
   
But....
   
Refuses to set all the way down?  Hmmmm....
   
A few whacks of a chisel...and, clean out the crumbs, this time..
   
That's a little better?    Repeat for the other corner....
   
And a full Dry Fit...

So...sometime today ( IF the Boss allows..) I can take all of this apart, set up the Stanley 45 to plough a 1/4" x 1/4" groove along the bottom edges of the sides, to house a 1/4" plywood panel....And see if that will be enough for one day....

Stay tuned...
Show me a picture, I'll build a project from that
Reply
#24
Stanley 45 is set up..
   
Had to build 4 different jigs...one per side...as each side is different...
   
whether it be for width..
   
or an angled edge..
   
Being different direction..( and a different length side) 
   

Then dry fit a couple sides, to mark out where to cut the plywood panel..
   
Bandsaw leaves a wavy line, Junior Jack soon straightens out..another dry fit, with the plywood..
   
Then take this all apart, add the glue, cauls and clamps..
   
And a square to check all the corners...
   
Close enough for the girls we go with?  

Sunday was a bit busy....floor had a slight "Krunch" to it...
   
Swept this mess up, called it a day....let this sit a day..
Stay tuned..
Show me a picture, I'll build a project from that
Reply
#25
Ok..up-date....clamps came off...needed to work on the glue joints..
   
The top needed a bevel as well...
   
Before it was glued into place...
   
Let this sit a day....then see about a matching bevel for the lid...


Then tried to level things up a bit...
   
Then got into way too big of a hurry....and fought the hinges...
   
Yep, these.....kept wondering WHY things weren't lining out....pilot holes for the screws wound up being stripped out....took a long break..

Came back to the shop.....looked things over......lid was upside down...Grrrrr..   Hinges were trashed...new ones dug out...and surface mounted..
   
These will be "Stand-ins" for now....until I get better ones.  And maybe inlay/inset them.   Front of the lid had a small sliver split off....decided to do a round-over along the edge..
   
Not much...
   
Which bring things up to today's Follies....

Stay tuned..
Show me a picture, I'll build a project from that
Reply
#26
(07-13-2022, 05:51 PM)bandit571 Wrote: Ok..up-date....clamps came off...needed to work on the glue joints..

The top needed a bevel as well...

Before it was glued into place...

Let this sit a day....then see about a matching bevel for the lid...


Then tried to level things up a bit...

Then got into way too big of a hurry....and fought the hinges...

Yep, these.....kept wondering WHY things weren't lining out....pilot holes for the screws wound up being stripped out....took a long break..

Came back to the shop.....looked things over......lid was upside down...Grrrrr..   Hinges were trashed...new ones dug out...and surface mounted..

These will be "Stand-ins" for now....until I get better ones.  And maybe inlay/inset them.   Front of the lid had a small sliver split off....decided to do a round-over along the edge..

Not much...

Which bring things up to today's Follies....

Stay tuned..

It’s looking good!

I appreciate you sharing the journey!
Reply
#27
More of a PIP, but...
   
A coat of Witch's Brew Stain has been brushed on...
   
A few details have been added, it wold seem..
   
Something to keep the pad from sliding off...
   
Something to keep the lid shut....open the lid...
   
The dividers were spaced to a perfect fit of a yellow "Legal" pad in the middle....and maybe some 3"x 5" index cards...and a few pens, pencils...


Have since given this a second coat of stain..and wiped that down...waiting to see how that dries...

Stay tuned..
Show me a picture, I'll build a project from that
Reply
#28
Boy o boy the wood looks great and the box came out as nice as well.


Have you ever made some chairs before?
As of this time I am not teaching vets to turn. Also please do not send any items to me without prior notification.  Thank You Everyone.

It is always the right time, to do the right thing.
Reply
#29
 Have made one Rocking chair over the last 10 years.....
Show me a picture, I'll build a project from that
Reply
#30
New hinges have been installed...
   
They are thin enough, that I can just surface mount them..
   
And then, I brushed a seal coat of Amber Shellac ....letting it dry a while....maybe after Lunch, today....I can rub it down with some 0000 steel wool, wipe that down...then..
   

One nice (maybe?) thing about taking all these photos....
   
Defects you might have missed, show up quite well for the camera.....so, while I was installing the new hinges...I cranked THAT screw down tight...

We'll see how today goes.....stay tuned..
Show me a picture, I'll build a project from that
Reply


Forum Jump:


Users browsing this thread: 3 Guest(s)

Product Recommendations

Here are some supplies and tools we find essential in our everyday work around the shop. We may receive a commission from sales referred by our links; however, we have carefully selected these products for their usefulness and quality.